Showing posts with label pictures. Show all posts
Showing posts with label pictures. Show all posts
Wednesday, March 15, 2017
New OBDSTAR X300 DP real pictures program key adjust mileage guide
New OBDSTAR X300 DP real pictures program key adjust mileage guide
Hi there! This blog tell you good news: OBDSTAR X300 DP is now available at diyobd2.fr! (Ready to send) And below are X300 DP real pictures and operating guides for key programming and mileage adjustment.
OBDSTAR X300 DP standard package: $929.25 free shipping
Immobilizer + odometer adjustment + EEPROM/PIC adapter + OBDII
OBDSTAR X300 DP full package: $719.25 free shipping
Immobilizer+ odometer adjustment+ EEPROM/PIC adapter+ OBDII+ ABS+ TPS+ SRS reset+ TPMS(low tire)reset+ Steering angle reset+ CVT learning/Value reset+ EPB+ Oil/service reset+ Battery matching+ Diagnosis for Japanese and Korean serials (extra bonus function)
OBDSTAR X300 DP tablet key programmer real pictures (took by diyobd.fr stuff):
OBDSTAR X300 DP main unit
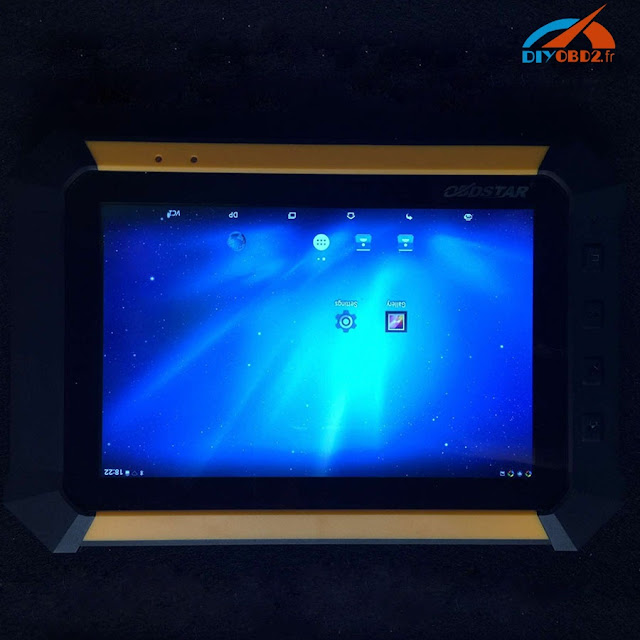
OBDSTAR X300 DP IMMOBILIZER function

OBDSTAR X300 DP Diag Program function

OBDSTAR X300 DP other reset functions

OBDSTAR X300 DP entire package


OBDSTAR X300 DP box

How OBDSTAR X300 DP adjust mileage for 2016 Cadillac ATS-L?
http://blog.diyobd2.fr/2016/12/07/nouvelle-arrivee-obdstar-x300-dp-adjust-mileage-pour-2016-cadillac-ats-l/
How OBDSTAR X300 DP program keys for Hyundai Elantra 2011?
First insert the new key into cylinder and turn ignition to ON position.

Now you will find the immobilizer light keep on at dashboard.
Power up OBDSTAR X300 DP tablet key programmer, click “Diag Program” then “Immobilizer”. Choose “Hyundai” then “Hyundai V30.24”

Choose “Read ID46 chip password”

Wait a second and it will read out the chip password as 963701.
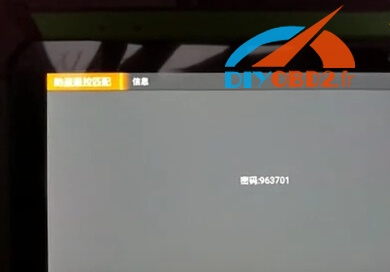
Then choose “Beijing Hyundai” (There is Korean Hyundai as well).
Choose program key by car model.
Select “Elantra 08-11” then “Immobilizer” click “Yes”.

Choose “key programming” click “Yes”. Enter password 963701.

Wait a while and it will show “Program success, whether to program next one?” Click “No” to complete program. Pull out the new key and wait 5 seconds.
Now OBDSTAR X300 DP program Hyundai Elantra 2011 successfully! The new key start car as expected!

Original - from diyobd2.fr obd2 francais:New OBDSTAR X300 DP real pictures+ program key+ adjust mileage guide
Available link for download

Friday, March 3, 2017
How to remove or hide downloads music homegroup pictures icons from start menu of Windows 10
How to remove or hide downloads music homegroup pictures icons from start menu of Windows 10
Windows 10 having a brand new UI got lot of changes,everyday we are talking about some changes
and errors that happen in our PC. Today in this post lets see how to hide downloads icon, hide
Documents icon,hide Music Icon ,hide pictures icon ,hide homegroup icon, and hide personal folder
icon in start menu of Windows 10. So, that your Start menu looks clean.
Do you need any Software to do this ?
No,you dont need any third party software, infact we dont need gpo to remove icons that we see on the start menu of Windows 10.
Then,how to do it?
just follow the below steps..
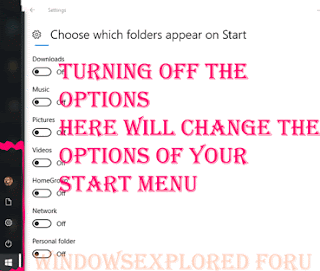
How to remove downloads icon from start menu of Windows 10
1) Press Windows + I Icons which will open settings
2) Click on Personalization.
3) Now,it will open a new window, with lot of options like Background,Colors,lockscreen,etc on the left pane, now look for an Option " start " and click it..
" The Start button will be available just above Taskbar(which is the last option in the left pane")
4) When you clicked,it will display the number of items like Show more tiles, Occasionally show suggestions in start, show most used apps ,etc options.
5) Scroll down to the last, you will see the option Choose which folders appear on start, click on it..
6) It will open a new window,Find and click on the downloads option tap/slide/click left side of the option to turn off.
Thats it.
How to remove File explorer icon from Start menu of Windows 10
1) Press Windows + I Icons which will open settings
2) Click on Personalization.
3) Now,it will open a new window, with lot of options like Background,Colors,lockscreen,etc on the left pane, now look for an Option " start " and click it..
" The Start button will be available just above Taskbar(which is the last option in the left pane")
4) When you clicked,it will display the number of items like Show more tiles, Occasionally show suggestions in start, show most used apps ,etc options.
5) Scroll down to the last, you will see the option Choose which folders appear on start, click on it..
6) It will open a new window,Find and click on the File Explorer option tap/slide/click left side of the option to turn off.
Thats it.
How to remove Music icon from Start menu of Windows 10
1) Press Windows + I Icons which will open settings
2) Click on Personalization.
3) Now,it will open a new window, with lot of options like Background,Colors,lockscreen,etc on the left pane, now look for an Option " start " and click it..
" The Start button will be available just above Taskbar(which is the last option in the left pane")
4) When you clicked,it will display the number of items like Show more tiles, Occasionally show suggestions in start, show most used apps ,etc options.
5) Scroll down to the last, you will see the option Choose which folders appear on start, click on it..
6) It will open a new window,Find and click on the Music option tap/slide/click left side of the option to turn off.
Thats it.
How to remove Pictutes from Start menu of Windows 10
1) Press Windows + I Icons which will open settings
2) Click on Personalization.
3) Now,it will open a new window, with lot of options like Background,Colors,lockscreen,etc on the left pane, now look for an Option " start " and click it..
" The Start button will be available just above Taskbar(which is the last option in the left pane")
4) When you clicked,it will display the number of items like Show more tiles, Occasionally show suggestions in start, show most used apps ,etc options.
5) Scroll down to the last, you will see the option Choose which folders appear on start, click on it..
6) It will open a new window,Find and click on the Pictures option tap/slide/click left side of the option to turn off.
Thats it.
How to remove Videos icon from Start menu of Windows 10
1) Press Windows + I Icons which will open settings
2) Click on Personalization.
3) Now,it will open a new window, with lot of options like Background,Colors,lockscreen,etc on the left pane, now look for an Option " start " and click it..
" The Start button will be available just above Taskbar(which is the last option in the left pane")
4) When you clicked,it will display the number of items like Show more tiles, Occasionally show suggestions in start, show most used apps ,etc options.
5) Scroll down to the last, you will see the option Choose which folders appear on start, click on it..
6) It will open a new window,Find and click on the Video option tap/slide/click left side of the option to turn off.
Thats it.
How to remove Network icon from Start menu of Windows 10
1) Press Windows + I Icons which will open settings
2) Click on Personalization.
3) Now,it will open a new window, with lot of options like Background,Colors,lockscreen,etc on the left pane, now look for an Option " start " and click it..
" The Start button will be available just above Taskbar(which is the last option in the left pane")
4) When you clicked,it will display the number of items like Show more tiles, Occasionally show suggestions in start, show most used apps ,etc options.
5) Scroll down to the last, you will see the option Choose which folders appear on start, click on it..
6) It will open a new window,Find and click on the Network option tap/slide/click left side of the option to turn off.
Thats it.
How to remove Homegroup icon from Start menu of Windows 10
1) Press Windows + I Icons which will open settings
2) Click on Personalization.
3) Now,it will open a new window, with lot of options like Background,Colors,lockscreen,etc on the left pane, now look for an Option " start " and click it..
" The Start button will be available just above Taskbar(which is the last option in the left pane")
4) When you clicked,it will display the number of items like Show more tiles, Occasionally show suggestions in start, show most used apps ,etc options.
5) Scroll down to the last, you will see the option Choose which folders appear on start, click on it..
6) It will open a new window,Find and click on the Homegroup option tap/slide/click left side of the option to turn off.
Thats it.
How to remove Personal folder icon from Start menu of Windows 10
1) Press Windows + I Icons which will open settings
2) Click on Personalization.
3) Now,it will open a new window, with lot of options like Background,Colors,lockscreen,etc on the left pane, now look for an Option " start " and click it..
" The Start button will be available just above Taskbar(which is the last option in the left pane")
4) When you clicked,it will display the number of items like Show more tiles, Occasionally show suggestions in start, show most used apps ,etc options.
5) Scroll down to the last, you will see the option Choose which folders appear on start, click on it..
6) It will open a new window,Find and click on the Personal Folder option tap/slide/click left side of the option to turn off.
Thats it.
How to remove settings icon from start menu of Windows 10
1) Press Windows + I Icons which will open settings
2) Click on Personalization.
3) Now,it will open a new window, with lot of options like Background,Colors,lockscreen,etc on the left pane, now look for an Option " start " and click it..
" The Start button will be available just above Taskbar(which is the last option in the left pane")
4) When you clicked,it will display the number of items like Show more tiles, Occasionally show suggestions in start, show most used apps ,etc options.
5) Scroll down to the last, you will see the option Choose which folders appear on start, click on it..
6) It will open a new window,Find and click on the Settings option tap/slide/click left side of the option to turn off.
Thats it.
You can also restore missing settings icon on start menu of Windows 10 by following the above steps,you just need to slide/tap right side of the option so that it shows ON
You can follow us on Social Media for latest updates daily for free.! by following any one of the social link you see on the right pane.
and errors that happen in our PC. Today in this post lets see how to hide downloads icon, hide
Documents icon,hide Music Icon ,hide pictures icon ,hide homegroup icon, and hide personal folder
icon in start menu of Windows 10. So, that your Start menu looks clean.
Do you need any Software to do this ?
No,you dont need any third party software, infact we dont need gpo to remove icons that we see on the start menu of Windows 10.
Then,how to do it?
just follow the below steps..
How to remove downloads icon from start menu of Windows 10
1) Press Windows + I Icons which will open settings
2) Click on Personalization.
3) Now,it will open a new window, with lot of options like Background,Colors,lockscreen,etc on the left pane, now look for an Option " start " and click it..
" The Start button will be available just above Taskbar(which is the last option in the left pane")
4) When you clicked,it will display the number of items like Show more tiles, Occasionally show suggestions in start, show most used apps ,etc options.
5) Scroll down to the last, you will see the option Choose which folders appear on start, click on it..
6) It will open a new window,Find and click on the downloads option tap/slide/click left side of the option to turn off.
Thats it.
How to remove File explorer icon from Start menu of Windows 10
1) Press Windows + I Icons which will open settings
2) Click on Personalization.
3) Now,it will open a new window, with lot of options like Background,Colors,lockscreen,etc on the left pane, now look for an Option " start " and click it..
" The Start button will be available just above Taskbar(which is the last option in the left pane")
4) When you clicked,it will display the number of items like Show more tiles, Occasionally show suggestions in start, show most used apps ,etc options.
5) Scroll down to the last, you will see the option Choose which folders appear on start, click on it..
6) It will open a new window,Find and click on the File Explorer option tap/slide/click left side of the option to turn off.
Thats it.
1) Press Windows + I Icons which will open settings
2) Click on Personalization.
3) Now,it will open a new window, with lot of options like Background,Colors,lockscreen,etc on the left pane, now look for an Option " start " and click it..
" The Start button will be available just above Taskbar(which is the last option in the left pane")
4) When you clicked,it will display the number of items like Show more tiles, Occasionally show suggestions in start, show most used apps ,etc options.
5) Scroll down to the last, you will see the option Choose which folders appear on start, click on it..
6) It will open a new window,Find and click on the Music option tap/slide/click left side of the option to turn off.
Thats it.
How to remove Pictutes from Start menu of Windows 10
1) Press Windows + I Icons which will open settings
2) Click on Personalization.
3) Now,it will open a new window, with lot of options like Background,Colors,lockscreen,etc on the left pane, now look for an Option " start " and click it..
" The Start button will be available just above Taskbar(which is the last option in the left pane")
4) When you clicked,it will display the number of items like Show more tiles, Occasionally show suggestions in start, show most used apps ,etc options.
5) Scroll down to the last, you will see the option Choose which folders appear on start, click on it..
6) It will open a new window,Find and click on the Pictures option tap/slide/click left side of the option to turn off.
Thats it.
How to remove Videos icon from Start menu of Windows 10
1) Press Windows + I Icons which will open settings
2) Click on Personalization.
3) Now,it will open a new window, with lot of options like Background,Colors,lockscreen,etc on the left pane, now look for an Option " start " and click it..
" The Start button will be available just above Taskbar(which is the last option in the left pane")
4) When you clicked,it will display the number of items like Show more tiles, Occasionally show suggestions in start, show most used apps ,etc options.
5) Scroll down to the last, you will see the option Choose which folders appear on start, click on it..
6) It will open a new window,Find and click on the Video option tap/slide/click left side of the option to turn off.
Thats it.
How to remove Network icon from Start menu of Windows 10
1) Press Windows + I Icons which will open settings
2) Click on Personalization.
3) Now,it will open a new window, with lot of options like Background,Colors,lockscreen,etc on the left pane, now look for an Option " start " and click it..
" The Start button will be available just above Taskbar(which is the last option in the left pane")
4) When you clicked,it will display the number of items like Show more tiles, Occasionally show suggestions in start, show most used apps ,etc options.
5) Scroll down to the last, you will see the option Choose which folders appear on start, click on it..
6) It will open a new window,Find and click on the Network option tap/slide/click left side of the option to turn off.
Thats it.
How to remove Homegroup icon from Start menu of Windows 10
1) Press Windows + I Icons which will open settings
2) Click on Personalization.
3) Now,it will open a new window, with lot of options like Background,Colors,lockscreen,etc on the left pane, now look for an Option " start " and click it..
" The Start button will be available just above Taskbar(which is the last option in the left pane")
4) When you clicked,it will display the number of items like Show more tiles, Occasionally show suggestions in start, show most used apps ,etc options.
5) Scroll down to the last, you will see the option Choose which folders appear on start, click on it..
6) It will open a new window,Find and click on the Homegroup option tap/slide/click left side of the option to turn off.
Thats it.
How to remove Personal folder icon from Start menu of Windows 10
1) Press Windows + I Icons which will open settings
2) Click on Personalization.
3) Now,it will open a new window, with lot of options like Background,Colors,lockscreen,etc on the left pane, now look for an Option " start " and click it..
" The Start button will be available just above Taskbar(which is the last option in the left pane")
4) When you clicked,it will display the number of items like Show more tiles, Occasionally show suggestions in start, show most used apps ,etc options.
5) Scroll down to the last, you will see the option Choose which folders appear on start, click on it..
6) It will open a new window,Find and click on the Personal Folder option tap/slide/click left side of the option to turn off.
Thats it.
How to remove settings icon from start menu of Windows 10
1) Press Windows + I Icons which will open settings
2) Click on Personalization.
3) Now,it will open a new window, with lot of options like Background,Colors,lockscreen,etc on the left pane, now look for an Option " start " and click it..
" The Start button will be available just above Taskbar(which is the last option in the left pane")
4) When you clicked,it will display the number of items like Show more tiles, Occasionally show suggestions in start, show most used apps ,etc options.
5) Scroll down to the last, you will see the option Choose which folders appear on start, click on it..
6) It will open a new window,Find and click on the Settings option tap/slide/click left side of the option to turn off.
Thats it.
You can also restore missing settings icon on start menu of Windows 10 by following the above steps,you just need to slide/tap right side of the option so that it shows ON
You can follow us on Social Media for latest updates daily for free.! by following any one of the social link you see on the right pane.
Available link for download
Thursday, February 16, 2017
How to Install a Hard Drive with Pictures
How to Install a Hard Drive with Pictures
 1. Power down the computer.Shut off the power supply in the back. Even if you can access the inside where it stands, you need to unplug the computer. Otherwise, unplug the computer and place it somewhere that allows you to get inside.
 2. Remove the case panels. You may need a Phillips head screwdriver, but most newer computers have thumbscrews. You will need to remove both sides so that you can screw the hard drive in on both sides.
- Ensure that you do not have any static electricity.Touch a metal object (other than your computer), such as a doorknob, to discharge any existing static electricity that you may have.
 4. Make sure you are grounded.If your computer is still plugged in (but the power supply is switched off), you can ground yourself by touching any metal part of the case. Otherwise, make sure that you are grounded before starting to work on the inside of the computer. This will prevent electrostatic shock from damaging the components of your computer.
 5. Remove the old drive (if applicable).If you are removing an old hard drive, make sure all of the cables are disconnected from both the motherboard and the power supply. Unscrew all the screws on both sides of the hard drive, and then slide it out of the housing.
- You may need to remove more cables or cards in order to access the hard drives in a tight case.


 6. Insert your new drive.Remove it from the antistatic packaging and slide it into an open space in the hard drive housing. The drive should slide directly in, and the holes on the side of the drive should line up to the screw guides on the housing.
- If you can, use a slot that has some space around it. This will improve airflow and lead to a cooler system, but is not a critical concern.
 7. Secure the hard drive.Once the hard drive has been inserted, use the screws that came with it to secure the hard drive in the housing. Ideally you should use two screws on each side of the hard drive. If the hard drive is loose, it can rattle and cause more noise and lead to physical damage.
- Tighten the screws to a firm tightness, but don’t overtighten as that may cause damage as well.
 8. Connect a SATA hard drive to the motherboard.Newer hard drives will use SATA cables, which are thin and resemble USB cables. Use a SATA cable to connect the hard drive to the motherboard. SATA cables can be connected in either direction.
- If you are connecting your primary hard drive, the SATA cable should be plugged into the first SATA channel. This may be labeled SATA0 or SATA1. Refer to your motherboard documentation for detailed information for your motherboard.
- Secondary drives should be connected to the next available SATA channel.
 9. Connect a PATA (IDE) hard drive to the motherboard.IDE drives are older model hard drives that can be identified by the long rows of pins on the back. IDE Drives are connected via an IDE cable, which is wide and flat. The cable is usually gray in color
- The blue end of the cable plugs into the motherboard. The black connector plugs into your primary (Master) drive, while the black connector plugs into the secondary (Slave) drive if applicable.
- Set the jumper for your primary drive to Master. The jumper diagram should be printed onto the hard drive. If you are installing a secondary drive but it is the only drive connected to the cable, it should be set to Master as well.
 10. Connect the power supply to the hard drive.Most newer power supplies have SATA power connectors, though older power supplies typically only have Molex (4 pin) connectors. If this is the case, and you are installing a SATA drive, you will need a Molex-to-SATA adapter. IDE drives will use the Molex connector.Make sure that all of your connections are secure. Ensure that none of the cables can come undone by wiggling them a little bit.
 11. Close up your computer.Replace the case sides and reconnect your cables if you had to move the case to work on the inside. Turn the power supply back on and then turn your computer on.
 12. Finish the installation.Once you’ve got everything connected and the computer turned back on, you’ll need to finish the installation of the hard drive from your computer. If you are replacing your primary drive, you’ll have to reinstall your operating system. If you are adding a new drive, youll need to format the drive before you can use it..


Method 2 Laptop Hard Drive
 1. Power down your laptop.Shut your laptop down completely (don’t put it in Sleep mode). Turn it over and remove the battery from the back of the laptop. This will help prevent the possibility of electrocution.
 2. Open the hard disk panel.This panel is located on the bottom of the laptop. You will need a small Phillip’s head screwdriver in order to remove the screws and the panel. The panel can be identified by the hard drive logo printed next to it.Almost every laptop can only fit one hard drive at a time. Some of the higher-end laptops may be able to support two. If you are replacing your only hard drive, you will need to reinstall your operating system after replacing it.
- Ensure that you do not have any static electricity. Touch a metal object (other than your computer), such as a doorknob, to discharge any existing static electricity that you may have.
 4. Unscrew the hard drive.Depending on the laptop, you may have to remove a screw or two before you can remove the hard drive. Not all laptop hard drives are secured by screws.
 5. Pull the ribbon to release the hard drive.The hard drive will pop back about half an inch, allowing you to remove it from its housing. Place your old hard drive somewhere safe in case you need to retrieve data off of it.
 6. Insert your new hard drive.Ensure that you insert it with the correct side facing out. Once you’ve placed the hard drive in the housing, press it firmly into the connectors. Do not force the hard drive, or you may damage the connectors. Once the hard drive is secure, reinsert any screws.
7. Close up the laptop.
Once the hard drive is installed, close up the panel and reinsert the battery. Make sure the panel is securely closed. You will now need to prepare the new drive:


Available link for download
Thursday, February 2, 2017
CARPROG V9 31 Full software download function list pictures
CARPROG V9 31 Full software download function list pictures
This blog will show you lots of pictures about CARPROG Full V9.31 function list KM Airbag IMMO. .. And you can download CARPROG V9.31 software here. Hope it helps!
Free download CARPROG V9.31 software?
https://mega.nz/#!QF4D2ajZ!sew7H0E2wZeo7bfNdM3XJn4yN8i2BZGQ1u4nmR-O3dA

Open CARPROG V9.31 software you can see the whole function list as below: AIRBAG, CAR RADIO, DASHBOARD, BIKES, INDUSTRIAL, IMMO, TRANSPONDER, EEPROM, MCU, ECU, EMULATOR and UPDATE.

First check DASHBOARD? VW

VW? AMAROK

VW? FOX

FOX? FOX 2013 MM NEC+ 95320 V0.3? EEPROM Read/ Write

Next check AIRBAG

Then CAR RADIO? VW AUDI

ECU? OPEL K LINE

OPEL K LINE? Bosch M1.5.5 ECU V1.0

Get CARPROG V9.31 full version ECU programmer with ALL 21 adapters at diyobd2.fr!
http://www.diyobd2.fr/wholesale/carprog-full-v531.html


Available link for download
Subscribe to:
Posts (Atom)