Sleep mode settings How to set or change sleep mode settings in Windows 10
Sleep mode settings- how to set or change sleep mode settings in Windows 10 thats what we gonna
see in this post - Works on Windows 10 Creators Update, Windows 10
Anniversary Update, and other editions of Windows like Windows 10 earlier builds like Aug 2015
and Nov 2015 builds.
In our last post, we had seen how to enable missing sleep option in windows 10 and how to put your
computer to sleep. but i hadnt explained how to change the amount of time your computer to put into sleep, which is essential when putting in your PC to sleep.Because its we need to decide how
long our computer needs to sleep for example if we set it 10 minutes, then our pc will go into sleep
after 10 minutes of non usage.
So,In this post lets see how to change sleep settings in Windows 10.
Again, the same words, you dont need an software to fix sleep mode settings on windows 10, all
you need to is just explore like i always do..
OK,lets see how to change sleep settings on Windows 10. there are two ways, we can change or set sleep settings in windows 10 one is traditional way through control panel and other is through
settings. If you are using windows 10 latest build, then youcant change sleep settings using control panel because they are migrated into new app called settings, so we can say the control
panel step wont work 99 % so i explain the steps through settings app. How to change sleep settings on Windows 10 and where is sleep mode located in windows 10
Just follow the below steps..
1) Open settings
[Helpful link : How to open settings using different methods in Windows 10]
2) Click on System.
3) It will open a new window, on that find an option called power & search options on your left pane..
4) Now, you will see different options on your right pane.. just look for an option sleep..
Under that, you will see On battery power, PC goes to sleep after and when plugged in. PC goes to sleep after options..
We need to customize that things, changing the things there would change the time our PC goes into sleep..
[Click on the image to view full size]
5) Set the amount of time you wish to set ..
For example : if your computer wants to go sleep after 10 min,which means if you wish to set sleep timer for 10 minutes, then choose 10 minutes on that options..
Music wont play over my bluetooth Speaker or headset How can i fix this Solved
Music wont play over my Bluetooth Speaker- how to fix it, thats what we gonna see in this post.
Today, when i visited my friends home he showed his new Bluetooth speaker and asked me some
suggestions why the music doesnt play over his bluetooth speaker. I Checked the usual procedures
like Whether sound drivers are installed, yes it was installed, i then checked device manager and
found out whether the device has drivers that support Windows 10, yes it was updated. But still the
problem persists later i changed an basic option that i forgot to do ???? and it fixed the problem.
So, if you are searching for something that will fix your problem of music not playing on bluetooth device connected to Windows 10, then here is your guide. Do you need any software ? No, but you need appropriate drivers.. if you had connected your PC to internet, then you dont need
to worry because when connected to internet windows will automatically download the required
update thourgh windows update. OK, then how to do it..?
Just follow the below steps.. Music wont play over my bluetooth Speaker or headset - Fix 1) As said earlier, your PC should have the latest device drivers..
if you suspect on how to confirm, check this article [Link 1] [Link 2]..
2) Check those two links, which may be helpful
After checking, make sure you had paired your bluetooth
[See : How to pair Bluetooth device in Windows 10]
3) Connect your Bluetooth device to Windows 10 PC
[See : How to connect Bluetooth device in Windows 10]
4) After, pairing, connecting its time to play some music..
5) Open your music player and play any music.
Now, on your taskbar on the far right you will see the Speaker icon..
i) Right click the speaker icon, it will display many options like Playback devices, Recording
SDATA Tool v1 0 0 USB or SD Memory Card Size Expanding Tool
SDATA Tool is a software which will double your Memory Card or SD Card size for example (2-4),(4-8) or (8-16) GB in just one click!
How To Use SDATA Tool:
Run SData Tool v1.0.0.exe as admin
Select Your Data to Compress Drive.
Click e-compress Now [Button]
Thats it, now you have just doubled your SD/Memory Card size. Enjoy!
Download link http://www47.zippyshare.com/v/SgzHWfJG/file.html Thanks to Mr. Titus Mukisa E-mail: mukisatitus@gmail.com Tel: +256782476780 +256702401917 Softek Systems™ Enjoy!
Turn live tiles on or Off settings in Windows 10 How to Updated
Windows 10 has an option like its predecessor Operating System known as live tiles.
What is live tiles in windows 10?
This live tiles are nothing but the option used to display the latest updates about the particular task
like update change in Weather using this live tiles. this will consume our bandwidth by running on
our Background.
lot, of us dont like this live tiles because of the above reason,but there are some people who likes it
mainly for their usefulness.
So, in this post lets see how to turn on live tiles on Windows 10 if it was not working and how to
turn off live tiles in Windows 10.
How to do it...?
Just follow the below steps.
How to turn off live tiles on Windows 10
1) Click on the Start button
2) It will display the live of items on the right pane
3) Right click on the tile you wish to turn off
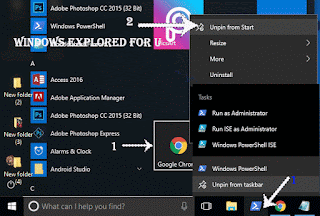
4) It will display options like unpin from start, Resize and More,on that click on More.(See screenshot posted below)
5) Now,you will find the option "Turn live tile on or off" or turn live tile off Click on it..
6) It will change into the Normal icon,which confirms your live tile is OFF.
like this, you can turn off all live tiles on Windows 10 desktop, also you dont need gpo or registry to turn off or reset this live tile.
How to turn on live tiles on Windows 10
1) Click on the Start button
2) It will display the live of items on the right pane
3) Right click on the tile you wish to turn on
4) It will display options like unpin from start, Resize and More,on that click on More.
5) Now,you will find the option Turn live tile on Click on it..
6) It will now change into different icon,which confirms your live tile is ON.
Note, if Windows 10 live tiles is not working, then you need to makesure the live tiles will work for that app/option, for example We cant set live tiles for Alarm and clock.
On screen keyboard in Windows 10 How to turn on or turn off Virtual or touch keyboard in Windows 10
On screen keyboard in Windows 10 - How to turn on or turn off Virtual or touch keyboard in
Windows 10 - thats what we gonna see in this post..
If you are searching for how to turn on On screen keyboard in Windows 10 or how to enable Virtual
touch keyboard then here is an guide that may help you.. Do you need any software ??
No, we dont need an software to enable on screen keyboard in Windows 10.Just follow the below steps..
Do you need to download Onscreen keyboard in Windows 10 ?
No, you dont need to download on screen keyboard of
Note : There are many ways we can turn on, On screen keyboard in Windows 10.
Like we can use Powershell to turn on, Onscreen Keyboard, Registry, and Command Prompt
however, i like to show only the easiest method to turn on, virtual touch keyboard in Windows 10.
You can even create shortcut for the Onscreen keyboard in Windows 10, if you wish.
Method 1 :using taskbar.
How to show touch screen keyboard in Windows 10
1) Sign-in to your Windows 10 PC
2) Right click on the taskbar
3) You will see, many options, like Toolbars, Cortana, etc..
Find and Click on Show touch keyboard button.
You will see the ? symbol near to show touchpad option,(when you right clicked on the taskbar again) which indicates your touchpad option is turned on.
4) A new icon keyboard like icon will appear on your taskbar, click on it..
It will open On Screen keyboard.
Thats it...
Method 2 : Using Run Command
1) Press Windows (logo) Key + R Key of your Keyboard
2) Type OSK
3) Hit enter.
Thats it..
How to turn off On Screen Keyboard that keeps popping up in windows 10
1) Right click on the taskbar
2) You will see, many options, like Toolbars, Cortana, etc..
Find and Click on Show touch keyboard button.
3) If the ? option hides, then your on screen touchpad will be disabled.
Thats it..
Hope it is helpful.
Are you a beginner ? then below is a link to find all the beginner articles that may help you in
various stages and in mastering basics of Windows 10, just click on the below link to view..
Program Peugeot 307 key Lexia3 PP2000 SBB V33 or Zed Bull
If you have lost the master key and badly need a new key programmed, you will be quoted euro 50-euro 200 from one place to another. It is a bit expensive. What device can you program a Peugeot new key?
Diyobd2.fr here gives some suggestions:
1) SBB V33 auto key programmer (French available)
The clone Silica SBB V33 key programmer will program my Peugeot 307 HDI spare key via immobilizer. But you need a pin code from BSI dump. There is a step-by-step document instruction: http://diyobd2pro.blogspot.com/2015/03/how-to-program-peugeot-307-can-2009-key.html http://www.slideshare.net/spobd2/program-peugeot-307-can-2009-key-with-french-sbb-v33-key-programmer If you have other car models, check the vehicle list first, http://www.diyobd2.fr/upload/pro/listado-de-sbb-vehicles-atendibles-2010.pdf
2) Lexia-3 cable Peugeot Planet 2000/Diagbox
For Peugeot, it is better to use lexia 3PP2000 to erase and add new key. You need a programmer to read dump from BSI to find the pin code/confidential code in case you don’t have it and use PP2000 or diagbox to program the key.
Here is a detail instruction: http://blog.udn.com/diyobd2fr/20529250
3) Zed Bull transponder clone key programmer
Zed Bull and Silica SBB V33 complete each other. With zedbull you can find pin code from dump and programming transponder directly from immo dump so in many cases you don’t need the car and SBB is connected to OBD port and you need pin to program transponder on the car.
In conclusion: Both Lexia 3 interface and SBB key programmer requires a pin code to access. But Zed Bull key pro does not need. Lexia3 XS Evolution will not program all Peugeot key, so better choose SBB v33 because it cheap at twice the price than Zed Bull.
Prompt: Peugeot 307 OBD diagnostic connector location On the right of steering wheel is a big plastic scew, turn that (will not come out) pull on cubby hole, whole bit of trim comes of and its there.
BMW ICOM or K Dcan cable to reset steering angle sensor
Here are two solutions of resetting BMW steering angle sensor, one using BMW ICOM ENET Toolset 32 for bmw F series, the other using INPA K+Dcan cable for bmw E series.
Why you need reset SAS?
The steering angle sensor (SAS) is a vital part of the ESC system that measures the steering wheel position angle and rate of turn.
When wheel alignment gets done or the actual physical direction the steering is set at, and the steering angle sensor’s last calibration is different enough to cause the DSC (dynamic stability control) ECU confusion in certain conditions.
Then you need to reset the steering angle sensor so that its straight ahead reading in software corresponds with the physical straight ahead position.
---> For BMW F series cars:
Solution 1: bmw icom with Tool 32 reset steering angle sensor
Bmw 320d f30 2005
Bmw icom a2
Toolset 32
Well connected ENET cable or ICOM emulator with vehicle
Start launching Toolset 32 /Tool32:
Select “Load SGBD Group file”
Find your DSC module and click “open”, for example, a E90 2005 320D it is DSC_87.prg)
Drop down the “Jobs” list and find out “lenkwinkel dsc abgleichen” option, ignition on and double click the option. Wait for about 10 seconds until the job is finished.
The steering Angle is calibrated and VIN is matched to car.
---> For BMW E series:
Solution 2: K+DCAN usb cable with INPA reset steering angle sensor
Bmw e46
K+dcan cable
Inpa software
Well connect k+dcan cable
open INPA on the laptop
Select vehicle as E46 Select chassis Select steering angle sensor Hit F5 to read status Hit F4 and the system will show the general status You will able to view the current steering angle sensor is calibrated to close to zero deg. when the physical steering is pointed straight ahead If the steering angle sensor calibration value is not extremely close or exact, you need to reset it. Go to main menu and select E46 again Select chassis Select DCS MK6 Click SHIFT+F4 buttons at the same, the system will display the compensation routines.
bmw icom a2+b+c diagnostic & programming tool
Avec un ordinateur portable
2016?12?22????
Réinitialiser le capteur dangle de direction BMW, Tool32 ou INPA?
Voici deux solutions de réinitialisation BMW capteur dangle de braquage, un à l aide de BMW ICOMENET Toolset 32 pour BMW Série F, lautre en utilisant le câble INPA K + DCAN pour BMW Série E.
Pourquoi vous avez besoin de réinitialiser SAS?
Le capteur dangle de braquage (SAS) est une partie essentielle du système ESC qui mesure langle de position du volant et la vitesse du tour.
Lorsque lalignement des roues se fait ou la direction physique réelle de la direction est fixé à, et dernier étalonnage capteur de langle de braquage de est assez différent pour provoquer le DSC (contrôle dynamique de la stabilité) ECU confusion dans certaines conditions.
Ensuite, vous devez réinitialiser le capteur dangle de braquage de sorte que son droit devant la lecture dans le logiciel correspond à la position droite physique.
-> Pour les voitures de série BMW F:
Solution 1: bmw icom avec outil de capteur dangle de braquage de 32 réinitialisation
Bmw 320d f30 2005
Bmw icom a2
Toolset 32
Bien relié par ENET cable ou émulateur ICOM avec le véhicule
Lancer le lancement Toolset 32 ??/ Tool32:
Sélectionnez "Charger fichier SGBD Group"
Trouvez votre module DSC et cliquez sur "ouvrir", par exemple, un E90 2005 320D est DSC_87.prg)
Dérouler la liste "Jobs" et trouver loption "lenkwinkel dsc abgleichen", contact et double-cliquez sur loption. Attendez environ 10 secondes jusquà ce que le travail est terminé.
Langle de braquage est calibré et VIN est adapté à la voiture.
-> Pour BMW Série E:
Solution 2: câble usb K + DCAN avec capteur dangle de braquage de remise à zéro INPA
bmw e46
K+dcan cable
Inpa software
Bien connecter k + câble DCAN
ouvert INPA sur lordinateur portable
Choisir véhicule E46 Choisir châssis capteur dangle Select de direction
Hit F5 pour lire l état Hit F4 et le système affiche létat général Vous sera en mesure dafficher le capteur dangle de braquage actuel est calibré à près de deg zéro.lorsque la direction physique est pointée droit devant Si la valeur détalonnage du capteur dangle de braquage est pas très proche ou exacte, vous devez le réinitialiser. Aller au menu principal et sélectionnez E46 nouveau Sélectionnez châssis Sélectionnez DCS MK6
Cliquez SHIFT + touches F4 au même, le système affiche les routines de compensation.
Click F1 button to reset the steering angle sensor Go back to steering angle sensor menu to view the current status. The calibrated value should go down to zero. The procedure is complete and then you can clear the error codes or do other coding options.
How to remove or hide downloads music homegroup pictures icons from start menu of Windows 10
Windows 10 having a brand new UI got lot of changes,everyday we are talking about some changes
and errors that happen in our PC. Today in this post lets see how to hide downloads icon, hide
Documents icon,hide Music Icon ,hide pictures icon ,hide homegroup icon, and hide personal folder
icon in start menu of Windows 10. So, that your Start menu looks clean. Do you need any Software to do this ?
No,you dont need any third party software, infact we dont need gpo to remove icons that we see on the start menu of Windows 10.
Then,how to do it?
just follow the below steps..
How to remove downloads icon from start menu of Windows 10
1) Press Windows + I Icons which will open settings
2) Click on Personalization.
3) Now,it will open a new window, with lot of options like Background,Colors,lockscreen,etc on the left pane, now look for an Option " start " and click it..
" The Start button will be available just above Taskbar(which is the last option in the left pane")
4) When you clicked,it will display the number of items like Show more tiles, Occasionally show suggestions in start, show most used apps ,etc options.
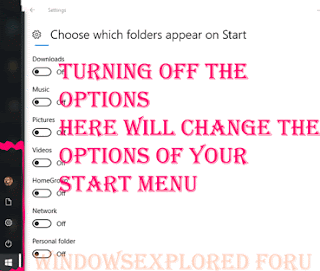
5) Scroll down to the last, you will see the option Choose which folders appear on start, click on it..
6) It will open a new window,Find and click on the downloads option tap/slide/click left side of the option to turn off.
Thats it. How to remove File explorer icon from Start menu of Windows 10 1) Press Windows + I Icons which will open settings
2) Click on Personalization.
3) Now,it will open a new window, with lot of options like Background,Colors,lockscreen,etc on the left pane, now look for an Option " start " and click it..
" The Start button will be available just above Taskbar(which is the last option in the left pane")
4) When you clicked,it will display the number of items like Show more tiles, Occasionally show suggestions in start, show most used apps ,etc options.
5) Scroll down to the last, you will see the option Choose which folders appear on start, click on it..
6) It will open a new window,Find and click on the File Explorer option tap/slide/click left side of the option to turn off.
Thats it.
How to remove Music icon from Start menu of Windows 10 1) Press Windows + I Icons which will open settings
2) Click on Personalization.
3) Now,it will open a new window, with lot of options like Background,Colors,lockscreen,etc on the left pane, now look for an Option " start " and click it..
" The Start button will be available just above Taskbar(which is the last option in the left pane")
4) When you clicked,it will display the number of items like Show more tiles, Occasionally show suggestions in start, show most used apps ,etc options.
5) Scroll down to the last, you will see the option Choose which folders appear on start, click on it..
6) It will open a new window,Find and click on the Music option tap/slide/click left side of the option to turn off.
Thats it.
How to remove Pictutes from Start menu of Windows 10 1) Press Windows + I Icons which will open settings
2) Click on Personalization.
3) Now,it will open a new window, with lot of options like Background,Colors,lockscreen,etc on the left pane, now look for an Option " start " and click it..
" The Start button will be available just above Taskbar(which is the last option in the left pane")
4) When you clicked,it will display the number of items like Show more tiles, Occasionally show suggestions in start, show most used apps ,etc options.
5) Scroll down to the last, you will see the option Choose which folders appear on start, click on it..
6) It will open a new window,Find and click on the Pictures option tap/slide/click left side of the option to turn off.
Thats it.
How to remove Videos icon from Start menu of Windows 10 1) Press Windows + I Icons which will open settings
2) Click on Personalization.
3) Now,it will open a new window, with lot of options like Background,Colors,lockscreen,etc on the left pane, now look for an Option " start " and click it..
" The Start button will be available just above Taskbar(which is the last option in the left pane")
4) When you clicked,it will display the number of items like Show more tiles, Occasionally show suggestions in start, show most used apps ,etc options.
5) Scroll down to the last, you will see the option Choose which folders appear on start, click on it..
6) It will open a new window,Find and click on the Video option tap/slide/click left side of the option to turn off.
Thats it.
How to remove Network icon from Start menu of Windows 10 1) Press Windows + I Icons which will open settings
2) Click on Personalization.
3) Now,it will open a new window, with lot of options like Background,Colors,lockscreen,etc on the left pane, now look for an Option " start " and click it..
" The Start button will be available just above Taskbar(which is the last option in the left pane")
4) When you clicked,it will display the number of items like Show more tiles, Occasionally show suggestions in start, show most used apps ,etc options.
5) Scroll down to the last, you will see the option Choose which folders appear on start, click on it..
6) It will open a new window,Find and click on the Network option tap/slide/click left side of the option to turn off.
Thats it.
How to remove Homegroup icon from Start menu of Windows 10 1) Press Windows + I Icons which will open settings
2) Click on Personalization.
3) Now,it will open a new window, with lot of options like Background,Colors,lockscreen,etc on the left pane, now look for an Option " start " and click it..
" The Start button will be available just above Taskbar(which is the last option in the left pane")
4) When you clicked,it will display the number of items like Show more tiles, Occasionally show suggestions in start, show most used apps ,etc options.
5) Scroll down to the last, you will see the option Choose which folders appear on start, click on it..
6) It will open a new window,Find and click on the Homegroup option tap/slide/click left side of the option to turn off.
Thats it.
How to remove Personal folder icon from Start menu of Windows 10 1) Press Windows + I Icons which will open settings
2) Click on Personalization.
3) Now,it will open a new window, with lot of options like Background,Colors,lockscreen,etc on the left pane, now look for an Option " start " and click it..
" The Start button will be available just above Taskbar(which is the last option in the left pane")
4) When you clicked,it will display the number of items like Show more tiles, Occasionally show suggestions in start, show most used apps ,etc options.
5) Scroll down to the last, you will see the option Choose which folders appear on start, click on it..
6) It will open a new window,Find and click on the Personal Folder option tap/slide/click left side of the option to turn off.
Thats it.
How to remove settings icon from start menu of Windows 10 1) Press Windows + I Icons which will open settings
2) Click on Personalization.
3) Now,it will open a new window, with lot of options like Background,Colors,lockscreen,etc on the left pane, now look for an Option " start " and click it..
" The Start button will be available just above Taskbar(which is the last option in the left pane")
4) When you clicked,it will display the number of items like Show more tiles, Occasionally show suggestions in start, show most used apps ,etc options.
5) Scroll down to the last, you will see the option Choose which folders appear on start, click on it..
6) It will open a new window,Find and click on the Settings option tap/slide/click left side of the option to turn off.
Thats it.
You can also restore missing settings icon on start menu of Windows 10 by following the above steps,you just need to slide/tap right side of the option so that it shows ON
You can follow us on Social Media for latest updates daily for free.! by following any one of the social link you see on the right pane.
Screen flickering in Windows 10 How to check whether display flash occurs because of driver or app in Windows 10
Screen flickering in Windows 10 - How to check whether display flash occurs because of driver or app in Windows 10 thats what we gonna see in this post..
In our last post, we had seen how to open task manager in windows 10 in this post,lets see how to
check screen flashing in windows 10 happens whether due to an incompatible app or the driver issue.
What are the causes for screen flickering in Windows 10 ?
Microsoft, says the Screen flickering in windows 10 usually occurs only because of two ways..
One is Incompatible app and the other is due to display driver problem.
OK, How to check it ?
If you think your windows 10 screen flashing occurs randomly or if you wish to fix laptop flickering
screen in windows 10. then the first step you need to do is to check whether it is because of windows issue or app issue.
So, in this post lets see how to determine the Screen flickering occurs because of Windows or incompatible app.
Do You need an software ?
No, you dont need an application to fix screen flickering in windows 10. That is , you dont need to
an software to check screen flickering in windows 10
then, how to do ...?
Just follow the steps below..
1) Login to your windows 10 PC
2) Open taskmanager
[See : How to open task manager in windows 10]
Does, your task manager flickers ? then it is because of driver problem. you need to update your display drivers.
[Helpful link : How to update display driver in windows 10 How to Update drivers in windows 10 ]
If your task manager doesnt flickers, then it is due to incompatible app, and you have no problem in
your PC.. just try closing and opening the app again,or reinstall the app it will fix the problem..
Thats it..
Using the above method, you can fix windows 10 screen flickering on any windows 10 laptop and
windows 10 desktop.
Are you a beginner ? then here is a link to find all the beginner articles, just click on the below link..
How to Unpin an App from start menu or Taskbar in Windows 10 Updated
Unpin an program or icon from start and taskbar - How to do in Windows 10 Creators update and so
on..
In our last post, we had seen how to pin an app to start menu in windows 10, how to pin an app to
taskbar in Windows 10 ( including an hidden trick??) . Thanks to our reader Michael for notifying
me to post how to unpin an app, program or in simple language the icon. What he did was pinned an
app to taskbar and start menu, he did everything right, except one thing, he pinned the wrong
program(which he doesnt want to do).Since he was a beginner, he asked me to post how to unpin an
app from taskbar, which he thought could help many fellow users like us..
So, in this post lets see how to unpin an app from start menu and taskbar, unpin an program from
start menu and taskbar, unpin an icon from start menu and taskbar ( Yup, they all are same terms and
follows same procedure????)
I like to say one thing, you dont need an software to unpin app from start. Also you dont need
registry or group policy to unpin program/icon from start or taskbar.
Just follow the below steps..
How to Unpin an program or icon or Application from taskbar in Windows 10
1) look for the app you wish to unpin from taskbar. on taskbar.
2) Right click on the item (apps icon) you wish to unpin on taskbar
3) You will see the Apps name, Unpin from taskbar , Close window Option,
4) Click on the Unpin from taskbar Option.
Fact ! if you see Pin to taskbar instead of Unpin from taskbar, then you dont need to do anything, because your app is either already unpinned from taskbar or yet to be pinned.
Thats it..
How to Unpin an program or icon or Application from start menu in Windows 10
1) Press Windows( logo) key on the keyboard or Click on the start button.
2) You will see some apps displayed there..
i) Scroll down and find the App you wish to Unpin from start menu
ii) Right click on that app
iii) It will display options like Unpin from start, Move, uninstall
iv) click on unpin from start.
Thats it..
You have done..???
like these, you can unpin any app from start menu in Windows 10 laptop or desktop...


![Music wont play over my bluetooth Speaker or headset. How can i fix this ? [Solved]](https://blogger.googleusercontent.com/img/b/R29vZ2xl/AVvXsEgcs1Et9S9kNJneksr2wysRSckh1uWBkzDhP1T8QeDHHjPVYzI_PEo47ALVY1_W8XxieUhdAa4klYOcWDrR9aEEcoKGvEfxe2OR9LerHcF__SSHDdjvys81IbYPZqllYYM7B_5Xy8ZUyQ8/s320/playback-devces.gif "Music wont play over my bluetooth Speaker or headset. How can i fix this ? [Solved]")