Showing posts with label solved. Show all posts
Showing posts with label solved. Show all posts
Wednesday, March 22, 2017
Windows 10 Not opening WiFi login Pages Solved
Windows 10 Not opening WiFi login Pages Solved
Today, while i wish to connect to a hotspot on my locality i had came up with a strange issue, the
2) Click on Network and Internet
3) It will open a new window, on that select WiFi on the left pane.
4) Now,look for an option on the right pane Hotspot 2.0 networks
![Windows 10 Not opening WiFi login Pages [Solved]](https://blogger.googleusercontent.com/img/b/R29vZ2xl/AVvXsEhSh6SjY4JDL2EsKrfX2hZV4_QS7fHX0N_tfAWewLet8Mx5xJWkUHl_R7qfm9zUGfNSsmqgBdJ2AWmLMHs3ZB_ofioG1nxeaLtXOji1e9vrgAxS4FQt3O0-lgyaMHwNNfpqc6ggSfY6uw4/s320/online-sig-up.gif "Windows 10 Not opening WiFi login Pages [Solved]")
5) Below, the option there will be a button to toggle "Let me use Online Sign-up to get connected"
6) click ap on the right side of the option to set it to ON
7) Now,try it will work, if possible Restart your PC ( i had done that).
Thats it..
I used the above steps, it worked for me so i shared here, if it doesnt help, then try disabling the Antivirus or firewalls or type the login page address on your address bar.
Hope it helps.??
WiFi adapters that worked fine suddenly started to mess up, i was unavailable to connect to any login
pages of WiFi. Initially i thought the problem was with browser settings and did reset. But that
went avail. I began to search for every possible solutions and found one setting as the culprit, which i
like to share it here.
If you are experiencing similar issue, then try this option which worked for me.
Did i used any Special or third party softwares ?
No,i just changed an Option in settings.
What option do you changed ? and how ?
Just follow the below steps..
Cannot open WiFi login Pages in Windows 10 - How to fix
1) Press Windows + I keys.
2) Click on Network and Internet
3) It will open a new window, on that select WiFi on the left pane.
4) Now,look for an option on the right pane Hotspot 2.0 networks
5) Below, the option there will be a button to toggle "Let me use Online Sign-up to get connected"
6) click ap on the right side of the option to set it to ON
7) Now,try it will work, if possible Restart your PC ( i had done that).
Thats it..
I used the above steps, it worked for me so i shared here, if it doesnt help, then try disabling the Antivirus or firewalls or type the login page address on your address bar.
Hope it helps.??
Available link for download
Tuesday, March 21, 2017
Music wont play over my bluetooth Speaker or headset How can i fix this Solved
Music wont play over my bluetooth Speaker or headset How can i fix this Solved
Music wont play over my Bluetooth Speaker- how to fix it, thats what we gonna see in this post.
Today, when i visited my friends home he showed his new Bluetooth speaker and asked me some
suggestions why the music doesnt play over his bluetooth speaker. I Checked the usual procedures
like Whether sound drivers are installed, yes it was installed, i then checked device manager and
found out whether the device has drivers that support Windows 10, yes it was updated. But still the
problem persists later i changed an basic option that i forgot to do ???? and it fixed the problem.
So, if you are searching for something that will fix your problem of music not playing on bluetooth
device connected to Windows 10, then here is your guide.
Do you need any software ?
No, but you need appropriate drivers.. if you had connected your PC to internet, then you dont need
to worry because when connected to internet windows will automatically download the required
update thourgh windows update.
OK, then how to do it..?
Just follow the below steps..
Music wont play over my bluetooth Speaker or headset - Fix
1) As said earlier, your PC should have the latest device drivers..
if you suspect on how to confirm, check this article [Link 1] [Link 2]..
2) Check those two links, which may be helpful
After checking, make sure you had paired your bluetooth
[See : How to pair Bluetooth device in Windows 10]
3) Connect your Bluetooth device to Windows 10 PC
[See : How to connect Bluetooth device in Windows 10]
4) After, pairing, connecting its time to play some music..
5) Open your music player and play any music.
Now, on your taskbar on the far right you will see the Speaker icon..
i) Right click the speaker icon, it will display many options like Playback devices, Recording
devices, Volume,Sounds, Troubleshoot Audio Problems.
![Music wont play over my bluetooth Speaker or headset. How can i fix this ? [Solved]](https://blogger.googleusercontent.com/img/b/R29vZ2xl/AVvXsEgcs1Et9S9kNJneksr2wysRSckh1uWBkzDhP1T8QeDHHjPVYzI_PEo47ALVY1_W8XxieUhdAa4klYOcWDrR9aEEcoKGvEfxe2OR9LerHcF__SSHDdjvys81IbYPZqllYYM7B_5Xy8ZUyQ8/s320/playback-devces.gif "Music wont play over my bluetooth Speaker or headset. How can i fix this ? [Solved]")
ii ) Click on Playback devices
iii) It will display the sound window.
iv ) Now, you can find devices under "Select playback device below to modify its settings"
v) There, if you had paired and connected your Bluetooth speaker or headset you will the see the
device there..
vi ) Select your device,if not
vii ) Right click the bluetooth device and click connect
viii) Now, again select your bluetooth speaker and select set it as default
You can see the audio playing on Bluetooth speaker from now on..
Thats it...
Hope it is helpful.
Thats the end of this post..
Click to read all basic tutorials..
Today, when i visited my friends home he showed his new Bluetooth speaker and asked me some
suggestions why the music doesnt play over his bluetooth speaker. I Checked the usual procedures
like Whether sound drivers are installed, yes it was installed, i then checked device manager and
found out whether the device has drivers that support Windows 10, yes it was updated. But still the
problem persists later i changed an basic option that i forgot to do ???? and it fixed the problem.
So, if you are searching for something that will fix your problem of music not playing on bluetooth
device connected to Windows 10, then here is your guide.
Do you need any software ?
No, but you need appropriate drivers.. if you had connected your PC to internet, then you dont need
to worry because when connected to internet windows will automatically download the required
update thourgh windows update.
OK, then how to do it..?
Just follow the below steps..
Music wont play over my bluetooth Speaker or headset - Fix
1) As said earlier, your PC should have the latest device drivers..
if you suspect on how to confirm, check this article [Link 1] [Link 2]..
2) Check those two links, which may be helpful
After checking, make sure you had paired your bluetooth
[See : How to pair Bluetooth device in Windows 10]
3) Connect your Bluetooth device to Windows 10 PC
[See : How to connect Bluetooth device in Windows 10]
4) After, pairing, connecting its time to play some music..
5) Open your music player and play any music.
Now, on your taskbar on the far right you will see the Speaker icon..
i) Right click the speaker icon, it will display many options like Playback devices, Recording
devices, Volume,Sounds, Troubleshoot Audio Problems.
ii ) Click on Playback devices
iii) It will display the sound window.
iv ) Now, you can find devices under "Select playback device below to modify its settings"
v) There, if you had paired and connected your Bluetooth speaker or headset you will the see the
device there..
vi ) Select your device,if not
vii ) Right click the bluetooth device and click connect
viii) Now, again select your bluetooth speaker and select set it as default
You can see the audio playing on Bluetooth speaker from now on..
Thats it...
Hope it is helpful.
Thats the end of this post..
Click to read all basic tutorials..
Available link for download
Wednesday, March 15, 2017
Airplane Mode in Windows 10 How to Fix Airplane wont turn off Stuck Solved
Airplane Mode in Windows 10 How to Fix Airplane wont turn off Stuck Solved
Windows 10 struck in Airplane Mode, cannot turn off Airplane mode windows 10, airplane mode
not turning off Windows 10, how to disable airplane mode in windows 10,cant turn off airplane
mode windows 10,airplane mode is not turning off - This are the complaints people do on the
Microsoft forum.

Though Airplane mode can be turned off using the settings App it wont work for
most users. They are increasingly complaining about the Airplane Mode issue in Windows 10.
If you are the one who has Airplane mode issue in Windows 10 then here is an experience of Mine
that may help you.
1) First, try turning off Airplane mode inside settings
[See : How to turn off Airplane mode in Windows 10
(The above article is for previous windows builds, if you are on latest Windows version like Creators
Update or Windows 10 Anniversary build, then check this [link] ]
Solution 2 : On Keyboard
1) Look for some specific key that has Radio or tower like symbol on the keyboard .
i) The Key will differ for every keyboard but the common key is prtsc or F12
ii) Hold your Fn key on the keyboard and hit the key that has tower symbol or just hit the key.
if you are using Dell laptop, then you can use Fn + prtsc
if you are using Hp laptop , then you can use Fn + F12 or simply F12
Like, this find the key and hit it with the alternative key.
Solution 3 :
The Above solutions worked for me.. But it doesnt worked for my friend who has different machine..
What worked for my friend is reinstalling the WiFi adapter driver.
1) Open device manager
How to Open Device Manager in Windows 10 [Guide]
2) Expand Network Adapter
![Airplane Mode in Windows 10 - How to Fix Airplane wont turn off Stuck [Solved]](https://blogger.googleusercontent.com/img/b/R29vZ2xl/AVvXsEhCqHZX9S_JXR2RSyD7wS1M3oeksLEX7mVTm_Oa2CnMX-SrFn4pSkx0PCMDhf1lHkhC9azFW6y39OBLle0w9v-JFIWeNAqbJUnhC_HHTvzJ4Xg_m83U6lmjB1pM4k6JHsMtJqq8OHqy0tE/s320/unistall-network.gif "Airplane Mode in Windows 10 - How to Fix Airplane wont turn off Stuck [Solved]")
3) Right click on the WiFi adapter
4) Click on Uninstall
5) Restart your PC.
This fixed the errors of mine and my friends laptop, i hope it helps for you too..
However, dont forgot to install the wifi driver back again, as it is required for your Wifi to work
seamlessly just connect your PC and connect to internet, till will take care of it..
Thats it..
Thats the end of this post..
Click to read all basic tutorials..
not turning off Windows 10, how to disable airplane mode in windows 10,cant turn off airplane
mode windows 10,airplane mode is not turning off - This are the complaints people do on the
Microsoft forum.
Though Airplane mode can be turned off using the settings App it wont work for
most users. They are increasingly complaining about the Airplane Mode issue in Windows 10.
If you are the one who has Airplane mode issue in Windows 10 then here is an experience of Mine
that may help you.
1) First, try turning off Airplane mode inside settings
[See : How to turn off Airplane mode in Windows 10
(The above article is for previous windows builds, if you are on latest Windows version like Creators
Update or Windows 10 Anniversary build, then check this [link] ]
Solution 2 : On Keyboard
1) Look for some specific key that has Radio or tower like symbol on the keyboard .
i) The Key will differ for every keyboard but the common key is prtsc or F12
ii) Hold your Fn key on the keyboard and hit the key that has tower symbol or just hit the key.
if you are using Dell laptop, then you can use Fn + prtsc
if you are using Hp laptop , then you can use Fn + F12 or simply F12
Like, this find the key and hit it with the alternative key.
Solution 3 :
The Above solutions worked for me.. But it doesnt worked for my friend who has different machine..
What worked for my friend is reinstalling the WiFi adapter driver.
1) Open device manager
How to Open Device Manager in Windows 10 [Guide]
2) Expand Network Adapter
3) Right click on the WiFi adapter
4) Click on Uninstall
5) Restart your PC.
This fixed the errors of mine and my friends laptop, i hope it helps for you too..
However, dont forgot to install the wifi driver back again, as it is required for your Wifi to work
seamlessly just connect your PC and connect to internet, till will take care of it..
Thats it..
Thats the end of this post..
Click to read all basic tutorials..
Available link for download
Friday, March 3, 2017
Where is C drive in Windows 10 Solved Beginners Guide
Where is C drive in Windows 10 Solved Beginners Guide
Where is C drive in Windows 10 - Thats the question i was asked by our blog reader. Though i
answered the question lot of folks are asking the same question..So i created a separate post on
where is c drive located in Windows 10. So,if you too have question like how to find c drive on my
windows 10 PC, then i hope this guide may be helpful for you .
First, Normally, windows 10 being a User friendly Operating System allows us to make our job more
than one way. So, to open c drive there are variety of methods available like using powershell and
start typing set-location c: , dir commands will display the information on that drive.
However, those things wont help beginners, what help is using the traditional way which is using
windows explorer or File Explorer.
1) First, Open file explorer
Dont know know how to open file explorer ?, dont worry, check the below link
[Helpful link : What is file explorer ? and how to open in Windows 10]
2) There, you will find the list of drives that were available on your System

3) Find the "Local disk C" , you can find it easier by looking for windows (logo) icon in the drive, which is your C drive..
Thats it..
Hope it is helpful.
Click to read all basic tutorials..
answered the question lot of folks are asking the same question..So i created a separate post on
where is c drive located in Windows 10. So,if you too have question like how to find c drive on my
windows 10 PC, then i hope this guide may be helpful for you .
First, Normally, windows 10 being a User friendly Operating System allows us to make our job more
than one way. So, to open c drive there are variety of methods available like using powershell and
start typing set-location c: , dir commands will display the information on that drive.
However, those things wont help beginners, what help is using the traditional way which is using
windows explorer or File Explorer.
1) First, Open file explorer
Dont know know how to open file explorer ?, dont worry, check the below link
[Helpful link : What is file explorer ? and how to open in Windows 10]
2) There, you will find the list of drives that were available on your System
3) Find the "Local disk C" , you can find it easier by looking for windows (logo) icon in the drive, which is your C drive..
Thats it..
Hope it is helpful.
Click to read all basic tutorials..
Available link for download
Thursday, March 2, 2017
Sleep option missing in Windows 10 Solved Updated to all builds
Sleep option missing in Windows 10 Solved Updated to all builds
Sleep option missing in Windows 10, how to enable it - Thats what we gonna see in this post. Works
on Windows 10 first build, Nov 2015 build, Anniversary build and Creators Update..
In our last post, we had seen how to put windows 10 pc to sleep, but the problem is some of our
users said, they cant find sleep option in windows 10 or more commonly sleep missing in
Windows 10 and they are increasingly asking on how to enable missing sleep option in Windows
10 pc.
Which, made me to write an separate post on it..,If you are searching for how to fix sleep option
that was not showing in power menu then i hope this guide solves your problem too.
Lets make a point clear.. You dont need to download software to fix missing sleep option in your
Windows 10 PC. As what we need to do is just configure a simple setting which we gonna see in the
below steps..
So, just follow the below steps, at the end you will see yourself fixing the no sleep option problem in Windows 10...
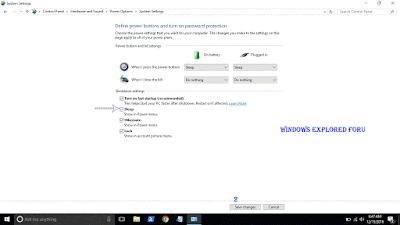
1) Open Control Panel.
[Helpful link : How to Open control panel in Windows 10 in different ways ]
Step 3 : Click on Hardware and Sound.
Step 4 : Find and Click On Change What the Power buttons do.
"the Option Change What the Power button do Will be Available under Power Options on right pane.
Step 5 : Click on Change Settings that Are unavailable on the Window that Opens.

on Windows 10 first build, Nov 2015 build, Anniversary build and Creators Update..
In our last post, we had seen how to put windows 10 pc to sleep, but the problem is some of our
users said, they cant find sleep option in windows 10 or more commonly sleep missing in
Windows 10 and they are increasingly asking on how to enable missing sleep option in Windows
10 pc.
Which, made me to write an separate post on it..,If you are searching for how to fix sleep option
that was not showing in power menu then i hope this guide solves your problem too.
Lets make a point clear.. You dont need to download software to fix missing sleep option in your
Windows 10 PC. As what we need to do is just configure a simple setting which we gonna see in the
below steps..
So, just follow the below steps, at the end you will see yourself fixing the no sleep option problem in Windows 10...
1) Open Control Panel.
[Helpful link : How to Open control panel in Windows 10 in different ways ]
Step 3 : Click on Hardware and Sound.
Step 4 : Find and Click On Change What the Power buttons do.
"the Option Change What the Power button do Will be Available under Power Options on right pane.
Step 5 : Click on Change Settings that Are unavailable on the Window that Opens.
Step 6 : Clicking on it will enable grayed out shutdown settings..
Below the shutdown settings ,you will see various options like Turn on Fast startup, Sleep , Hibernate,etc..
Step 7 : Check the on Sleep option check box.
Step 8 : Click on Save Changes..
Thats it...
Now, visit again your start menu.. Boom?? sleep problem will be resolved you will get back your sleep option, ..
Enjoy..
Other Basic Articles ...
How to Pin App to start menu in Windows 10 [Updated]
Pin app to taskbar in Windows 10 - How to [Updated]
Available link for download
Wednesday, March 1, 2017
Your Microsoft Account requires Attention to get Insider Builds Fix Solved
Your Microsoft Account requires Attention to get Insider Builds Fix Solved
Your Microsoft Account requires Attention to get Insider Builds and a Fix me button - This is the
error i got when i tried to activate insiders program on my friends Windows 10 Laptop. If you are
searching this then, probably You must be the one who loves to tweak or customize your PC and the
one who loves to get the latest among others. So, i think you dont need a bit of introduction to what insider build means, so lets move to
the direct post.

Why/ When this error happens ?
You wish to join Insider program and you clicked the Join Insider Program button, you will be
prompted to enter into your Microsoft account, thats the process behind it.. Though you dont need
an Microsoft Account to use your Preview builds,When you understand the error it says you need to
sign-in using your Microsoft Account to fix the error.,
So, how to solve it..? Just
1) Open settings
2) Click on Accounts
3) click on Your Info
4) On your Right pane, you will see Sign-in using Microsoft Account Instead option
5) Click on it..
6) It will ask you to enter the email, Password enter it.
7) Follow the onscreen instructions
8) Go back to insider program window and click Fix.
It will work now..
If that failed, then try this
Resign-in to your Microsoft Account., this wont make sense but its what worked for me (when i
used insider builds on the beginning)...
9) Follow the above steps (1 to 3)
10) On your right pane, click on Sign-in using local account instead
11) Follow the onscreen instructions, and again follow solution 1.
You will it working now..
If everything fails, Restart your PC and try visiting insider.windows.com and click on get started and
then , it will sign-in using your Microsoft Account., You will get " Welcome to the program, insider
"screen which indicates you are now an insider.
Try Registry editor..
1) Open registry editor
2) Navigate to following Key
HKEY_LOCAL_MACHINESOFTWAREMicrosoftWindowsSelfHostApplicability
3) On your right pane, you can see EnableInsiderPreviewBuilds
4) Click on it and set its value 1.
Restart your PC and go to join insider program on settings, you can find it working now..
See you soon!????
error i got when i tried to activate insiders program on my friends Windows 10 Laptop. If you are
searching this then, probably You must be the one who loves to tweak or customize your PC and the
one who loves to get the latest among others. So, i think you dont need a bit of introduction to what insider build means, so lets move to
the direct post.
Why/ When this error happens ?
You wish to join Insider program and you clicked the Join Insider Program button, you will be
prompted to enter into your Microsoft account, thats the process behind it.. Though you dont need
an Microsoft Account to use your Preview builds,When you understand the error it says you need to
sign-in using your Microsoft Account to fix the error.,
So, how to solve it..? Just
1) Open settings
2) Click on Accounts
3) click on Your Info
4) On your Right pane, you will see Sign-in using Microsoft Account Instead option
5) Click on it..
6) It will ask you to enter the email, Password enter it.
7) Follow the onscreen instructions
8) Go back to insider program window and click Fix.
It will work now..
If that failed, then try this
Resign-in to your Microsoft Account., this wont make sense but its what worked for me (when i
used insider builds on the beginning)...
9) Follow the above steps (1 to 3)
10) On your right pane, click on Sign-in using local account instead
11) Follow the onscreen instructions, and again follow solution 1.
You will it working now..
If everything fails, Restart your PC and try visiting insider.windows.com and click on get started and
then , it will sign-in using your Microsoft Account., You will get " Welcome to the program, insider
"screen which indicates you are now an insider.
Try Registry editor..
1) Open registry editor
2) Navigate to following Key
HKEY_LOCAL_MACHINESOFTWAREMicrosoftWindowsSelfHostApplicability
3) On your right pane, you can see EnableInsiderPreviewBuilds
4) Click on it and set its value 1.
Restart your PC and go to join insider program on settings, you can find it working now..
See you soon!????
Available link for download
Saturday, February 25, 2017
Windows 10 C Drive Full without any reason Solved solution
Windows 10 C Drive Full without any reason Solved solution
My c drive suddenly Full without reason in Windows 10 - This time its not for my friends, to me??
Creators Update, Windows 10 Anniversary Update, and other editions of Windows like Windows 10
earlier builds like Aug 2015 and Nov 2015 builds..
![Windows 10 C Drive Full without any reason [Solved]](https://blogger.googleusercontent.com/img/b/R29vZ2xl/AVvXsEhgy4LcOlnzCqg7ti9DuIXcXrAAaMshbvEbvUIATCcLhgL9OX4DeDATplXbZBTzjLY_6i-gSsd0pF0M-m18hoZ4l8V4cfWdFflyCFqt1Iwx3mU0h1U_f2r9X29yknpkA9wkTwsHwz4skZw/s400/c-drive-full.gif "Windows 10 C Drive Full without any reason [Solved]")
1) Right click on This PC and Select Properties.
[See : How to make Windows to show desktop icons in Windows 10 ]
2 )Click on System Protection on the left pane.
??( I smiled because i fixed the problem :0 ) If you are experiencing the same problem and have
questions like "c drive keeps filling up in my windows 10 PC" or "My c drive suddenly in full
windows 10" or any other related query, then here is a simple guide that may help you to fix the
problem. -Works on Windows 10
Creators Update, Windows 10 Anniversary Update, and other editions of Windows like Windows 10
earlier builds like Aug 2015 and Nov 2015 builds..
How to clean it?
There, are many things that may fill up your PC like installing many softwares, your PC has more
files and something related to it..
But, sometimes you may find your C drive full without any reason, like it happened to me, I just
wrote a blog post about how to Check amount of free space in hard disk or SSd you can see it
[here] but when i returned after my breakfast i was shocked to see My hard disk Space becoming
almost full and a low space notification starts to appear.
I dont know, what happened to my PC, so i started to figure out the things.. Which i worked..
First, i checked Whether System restore point was full.
How to clean System Restore Points in Windows 10
1) Right click on This PC and Select Properties.
[See : How to make Windows to show desktop icons in Windows 10 ]
2 )Click on System Protection on the left pane.
3) It will Open System Properties
4) Select the C drive on the Protection settings
5) Click Configure
6) It will open System Protection for Local Disk C:
7) Click on Delete
8) Click on Apply - > OK.
Unfortunately, it doesnt showed much result to me, So i moved to the next step which is
clearing Recycle Bin
How to delete Recycle bin files in Windows 10
1) Open recycle bin
[ Helpful link : Where can i find recycle bin in Windows 10]
2) Press Ctrl + A, and then Shift + Delete keys on Keyboard
Thats it..
It doesnt worked for me, because i usually delete files using the shift + Del method which
will permanently delete all your files.
So, i moved to clear temp section..
How to clear temp in Windows 10..
Refer the below video..
[Video tutorial]
It cleared some free space, but still im not satisfied..
Next, i thought to use disk clean up utility but, i thought it wont yield better result, because i only
performed the disk cleanup the previous day.
At last, i done something unusual (i dont know how it appeared on my mind) its looking on Event
viewer.
I finally solved the problem. What happened to my PC was,it faced with Blue screen of Death error
again and again.
So, it was the log files that increased my PC storage, Clear it and you will get back your free hard
drive space of C drive.
Since, it worked for me on the previous step, i had stopped. However, if your issue was still resolved,
try deleting or uninstalling a program that occupies your hard disk Space.
Thats it..
Click to read all latest articles.
Available link for download
Friday, February 24, 2017
Windows 10 insider preview build 15007 doesnt start downloading Solved
Windows 10 insider preview build 15007 doesnt start downloading Solved
Microsoft introduced Windows 10 Insider Preview 15007 have some problems right from its
![Windows 10 insider preview build 15007 doesnt start downloading [Solved]](https://blogger.googleusercontent.com/img/b/R29vZ2xl/AVvXsEit85lwFb5mVs23FBnlaKBKn0IenUxO3VNteuC7aGEvBuY8nusdiOWrCRifNZJ2yE3q6jvQFe05eOB5XwXxbJyNRc4-gUtPPhIGsWsqIpJnSBj5HcFUyJ6qGH05Im_GXkXvAMn6Acclx-s/s320/gp.gif "Windows 10 insider preview build 15007 doesnt start downloading [Solved]")
download. Some of my friends faced some problem with the update process.. Particularly, On one of
my friends PC there is a serious problem on the update.. What the problem was
In the update section there is a message "Some Updates are Available " and under
that there is a download progress meter like mine, but it doesnt start downloading, he kept it for
more than 4 hrs,
nothing happened there was still just that screen. So if you are facing such error, then i hope this
solution might work for you..
Since, you are a insider i think you dont need an intro to such things, So lets go directly to the point..
1) Open an elevated Command Prompt or Powershell
2) Type gpupdate/force
3) Restart your Computer
and try again, you will see the update now downloading..
It worked for my friend, and i hope it works for you too..
Enjoy...
Available link for download
Monday, February 20, 2017
solved PSA Diagbox processes always open in memory
solved PSA Diagbox processes always open in memory
In order to not having all Diagbox processes open in memory until the moment i start Diagbox software, i have disabled its windows start commands, stopped and changed its services to manual and made a .cmd file to start the PSA diagbox, this way:
1. run > msconfig > start tab > disable ediagstart + psaagent + simbat > accept > dont restart yet
2. run > services.msc > stop these services and change them to manual: Firebird Guardian + Firebird Server + Serial Port Splitter service
3. run > notepad > copy/paste next lines and save file as .cmd so that you can start it all:
C:APPfirebird infbguard.exe -s
C:APPfirebird infbserver.exe -s
C:WINDOWSsystem32ftspssrv.exe
C:APPediageDiagStart.lnk
C:APPddc inpsastart.exe C:APPddc inpsaagent.exe
C:APPSIMSIMBat.lnk
C:AWRoot inlauncherLctPOLUX.exe
alternatively you can move the created .cmd file to c: and create a shortcut to it in the desktop, rename it to Diagbox and then change its icon taking it from the file at c:AWRoot inlauncherLctPOLUX.exe
restart computer and try, not responsible if Diagbox gets corrupted and need reinstall, for me it is working great.
(Big thanks to manocao shares the info at http://cartechnology.co.uk/)
Available link for download
Thursday, February 9, 2017
100 solved Renault can clip “No Sensor Detected” diyobd2
100 solved Renault can clip “No Sensor Detected” diyobd2
This is the best solution from pros of Renault CAN CLIP error “No Sensor Detected, check the sensor connections and ensure that the supply to the vehicle is correct, then try again.”

Reasons for “No Sensor Detected”:
The error message pops up usually when run CLIP at the beginning, which means the the software cannot recognize the Renault CAN CLIP diagnostic interface

Solved by pros!
First, please check the Renault CLIP driver installation:
CLIP driver installation completes after running Crack Renault CLIP, installing Renault CLIP software, setting up CLIP properties, registering CLIP.
Here goes to install CAN CLIP v163/v162driver software....
The driver software is automatically installed
Open computer management
select Device manager->Bosch automotive service solution device->18-alliance vehicle communication interface
close Computer management
Open Display properties
Go to screen saver->power and setup:
power scheme: Always on
Turn off monitor: never, never
Turn off hard disk: never, never
System standby: never, never
Click on Apply, then OK to exit

if the driver has been set up as above, try run CLIP again. If the error message remains, please try the solutions below.
Second, check the connection of the renault can clip diagnostic tool and the car.
Using the obdii cable to connect the can clip unit to the obd port on the car


And if all is well connected, the four LEDs should be lighted.

Good luck and enjoy clipping!
Original - from can clip:(100% solved) Renault can clip “No Sensor Detected” (diyobd2)
Available link for download
Tuesday, February 7, 2017
solved Renault CAN CLIP 20 firmware update
solved Renault CAN CLIP 20 firmware update
Here are some customer solutions of Can Clip Renault firmware update stops at 20%, some solved by files rename and some by CLIP pcb reword.
Solution I said 100% working:
For those who have a Chinese Can clip that remain stuck at 20% on the update of the firmware here is the procedure to stop the worries and can again use the Clip device.
Must rename the following files:
C: CLIP DATA APPLI PARAMS appliiso.s19 in appliiso.bak
C: CLIP DATA APPLI PARAMS applican.s19 in applican.bak
tested by myself work 100%
Solution II:
if firmware update stops at 20% the solution is very easy
Exist some problems in hardware ... ISO pcb or CAN pcb
For bypass that error search for 2 files APLIISO.S19 and APLIICAN.S19 and rename this files to .bak one time ISO ...start the soft and ceck .... and one time CAN and restrt the soft and ceck...and you see where is the problem CAN hardware or ISO hardware....
The files is located here :
C:ASDEMODULES
C:CLIPDATAAPPLIPARAMS
If you have renamed the right file no more firmware stop at 20% but the problem on hardware remain and is possible use the interface only for ISO or only for CAN vehicles.....or put the interface in trash !!!!
BUT, some say the exactly reasons for 20% update problem is not the software problem!It’s HARDWARE problem with your clone CLIP sonde. You probably have bad flash chip or bad soldering, or bad oscillator, or, ... you name it, but anyway as I said its pure hardware problem. You can avoid firmware update for ISO or CAN board with renaming few files, but that is not solution because if you cant update firmware, your CLIP will not work properly.
Solution III:
Besides two pcbs inside Clip (can and iso) there is small thrid pcb where is round connector for car cable . When this cable is plugged and unplugged to Clip very often ( which needs a little force ), then solderings on metal pins which links this small pcb with rest of clip are breaking with the time.
You just need to resolder connections of these pins.
I did it and it solve update 20% problem
You just need to resolder connections of these pins.
I did it and it solve update 20% problem
Reference:
How to repair Renault CAN CLiP hardware -flash ISO & CAN BDM chip:
http://obd2francais.blogspot.com/2016/08/how-to-repair-renault-can-clip-hardware.html
What is a CLIP with good PCBs:


Source: http://www.diyobd2.fr/wholesale/renault-can-clip-diagnostic-interface.html
Original:(solved) Renault CAN CLIP 20% firmware update
Available link for download
Saturday, February 4, 2017
Extensions tab on history window missing in Chrome 55 and later Solved Here is a way to launch extensions again
Extensions tab on history window missing in Chrome 55 and later Solved Here is a way to launch extensions again
Where are my extensions in chrome, where is the about button in chrome - thats what people are
searching in Chrome 55 which can be downloaded using official site google.com/chrome.
Recently if you had updated your google Chrome then, you may be aware of this. Google redesigned
the Chromes History tab as it replaced it with the complete material design. The chrome 55 update
also features some bug fixes, but the popular extensions and about tabs are missing in Chrome
version 55 and later in the history window.
So, in this post lets see how to access extensions tab, where extensions in chrome located and how to
access extensions in Chrome.
What is mean by extensions ?
As the name suggests, extensions are nothing but the additional things that help the user to add some
more facilities the browser lacks. For example : In Some btowsers, the translate of page is done by
the extensions.So they are simply the additional facility that can be downloaded and installed.
In Chrome, they are available in .crx files, Which means when you download chrome extension you
will see the filename .crx files downloading..
Where are my extensions in Chrome ?
They are located inside the Chrome folder which would be on many locations like AppData,
program files and so on.
How can i find extensions on Chrome ?
In the earlier versions of Chrome, you can see the Chrome extensions tab available on the history tab
which can be opened by simply pressing ctrl + H keys on keyboard. But in the update the extensions
tab was removed so, you cant open it using that method, you need to follow the main method...
1) Open Google Chrome.
2) On the top right corner, you will see the ? icon click on it..
3) It will display many options like New tab, New Windows,etc.. Find More tools option and click
on it.
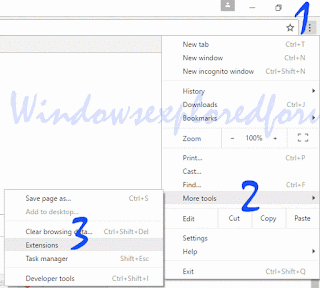
4) When you clicked it will open more options now like Save page as, Add to desktop, Clear browsing data, extensions, etc..
5) Click on Extensions
Thats it..
You will find all your Extensions there...
Thats the end of this post..
Click to read all basic tutorials..
searching in Chrome 55 which can be downloaded using official site google.com/chrome.
Recently if you had updated your google Chrome then, you may be aware of this. Google redesigned
the Chromes History tab as it replaced it with the complete material design. The chrome 55 update
also features some bug fixes, but the popular extensions and about tabs are missing in Chrome
version 55 and later in the history window.
So, in this post lets see how to access extensions tab, where extensions in chrome located and how to
access extensions in Chrome.
What is mean by extensions ?
As the name suggests, extensions are nothing but the additional things that help the user to add some
more facilities the browser lacks. For example : In Some btowsers, the translate of page is done by
the extensions.So they are simply the additional facility that can be downloaded and installed.
In Chrome, they are available in .crx files, Which means when you download chrome extension you
will see the filename .crx files downloading..
Where are my extensions in Chrome ?
They are located inside the Chrome folder which would be on many locations like AppData,
program files and so on.
How can i find extensions on Chrome ?
In the earlier versions of Chrome, you can see the Chrome extensions tab available on the history tab
which can be opened by simply pressing ctrl + H keys on keyboard. But in the update the extensions
tab was removed so, you cant open it using that method, you need to follow the main method...
1) Open Google Chrome.
2) On the top right corner, you will see the ? icon click on it..
3) It will display many options like New tab, New Windows,etc.. Find More tools option and click
on it.
4) When you clicked it will open more options now like Save page as, Add to desktop, Clear browsing data, extensions, etc..
5) Click on Extensions
Thats it..
You will find all your Extensions there...
Thats the end of this post..
Click to read all basic tutorials..
Available link for download
solved ICOM NEXT ISTA P error occurred during execution
solved ICOM NEXT ISTA P error occurred during execution
Used ISTA / P 3.60.1 (Loader 6.1F) with ICOM NEXT for bmw motorcycle programming but met the error message:
Fehler
Bei der Durchfuhrung der MaBnahme ist ein Fehler aufgetreten
94201 Fachdiendtinitialisierung fhelgeschlagen
-2 Global Unknown
1000000 Global Unknown


(Error in ISTA P
An error occurred during the execution of the action
94201 Technical deadline initialization fhelgeschlagen
-2 Global Unknown
1000000 Global Unknown)
Here is the customer solution:
Try to disconnect the battery for 15 min.
then reconnect the battery
turn ignition on (KL:15)
wait 1min and then connect the ICOM and restart
then reconnect the battery
turn ignition on (KL:15)
wait 1min and then connect the ICOM and restart
On a note from another:
There is not enough info to determine which model the programming is being attempted on but the belief that disconnecting battery on the the bikes does some form of reset on engine ECU is an urban myth, power is removed from the processor systems and memory every time the ignition is turned off
I will try and report here. Hope it does help.
Original:(solved) ICOM NEXT ISTA-P error occurred during execution
Available link for download
solved GM tech 2 error E666 service programming system denied
solved GM tech 2 error E666 service programming system denied
Here is a customer solution of GM tech 2 error E666. When trying to access to SPS, it keeps error E666: Access to Service Programming Server was denied.

Possible solution: (try on your own risk)
You need a New-Different "Safe" cable if you using USB ---->RS232.....
make sure the cable is a rs-232 and not a rs232c

(all tech2 packages all at diyobd2 includes this HQ rs232 adapter)
To set COM port.
---> under CONFIGURATION>I/O MANAGEMENT>TECH2>PROPERTIES.
---> under CONFIGURATION>I/O MANAGEMENT>TECH2>PROPERTIES.
NOTE:
Normal TIS2000 software that comes with it requires?an individual USB security dongle, (most dongle in the kit is useless).Go figure. TIS2000 is COM yet the security is USB. This REALLY screws up things sometimes.
If you do need the dongle and dont have one, it will come with error E666
Tech support from http://www.diyobd2.fr/
Original:(solved) GM tech 2 error E666 service programming system denied
Original:(solved) GM tech 2 error E666 service programming system denied
Available link for download
Wednesday, January 25, 2017
Computer takes too long to boot after Intel display driver update in Windows 10 Solved
Computer takes too long to boot after Intel display driver update in Windows 10 Solved
Today, i faced with a problem. My Windows 10 laptop took some more time to boot into desktop
then its actual time. I decided to find out the reason so, i checked windows update and found there
was an update installed to my PC through windows update and it is for Display adapter by Intel
Corporation. So, i decided to fix it and fixed myself using the steps given below.. If you are facing
with such issue then i hope it might be helpful for you ..
Why this happens?
Normally, Updates are served to fix the bugs that resides in the previous version, Updating the driver
will give you a more control on your display like more accurate text display and scaling,
resolution,etc..
But, inorder to perform those our PC must start the driver right ? So, its the startup of driver that
makes our windows 10 laptop or Windows 10 desktop to took more time.
So, how to fix it ?
Just turn off the startup of Intel driver.
How to turn off or disable the startup of Intel driver in Windows 10
1) Press Ctrl + Shift + Esc
2) It will display the task manager, click on the Startup tab.
3) You will find list of programs that start on your Windows 10 computer.
4) Find "hkcmd Module, igfxTray Module ,Persistence Module or some other things that were
developed by Intel Corporation.
Important note : Some of them will be a core property of your display or some other devices driver,
so disabling those things will make your system unstable, so its better to leave it on, unless it really
slows your system..
![Computer takes too long to boot after Intel display driver update in Windows 10 [Solved]](https://blogger.googleusercontent.com/img/b/R29vZ2xl/AVvXsEjWNNjTTmG82Ucc-FpysKz9xSlw5G8QIYGgZt4PWAEZtE3ZBzjwjtctGaBCTdvIgHr-gcev7xBWuW1ucufHHwIXoysZFo3xc-ldxfHMIBvnPN1T8X3Hp9Eubj4fhsD_Gf0S-gj79tf1XzI/s320/persistance.gif "Computer takes too long to boot after Intel display driver update in Windows 10 [Solved]")
5) Right click on those items and select disable.
Thats it..
This fixed the problem of mine..
Click to find latest articles
then its actual time. I decided to find out the reason so, i checked windows update and found there
was an update installed to my PC through windows update and it is for Display adapter by Intel
Corporation. So, i decided to fix it and fixed myself using the steps given below.. If you are facing
with such issue then i hope it might be helpful for you ..
Why this happens?
Normally, Updates are served to fix the bugs that resides in the previous version, Updating the driver
will give you a more control on your display like more accurate text display and scaling,
resolution,etc..
But, inorder to perform those our PC must start the driver right ? So, its the startup of driver that
makes our windows 10 laptop or Windows 10 desktop to took more time.
So, how to fix it ?
Just turn off the startup of Intel driver.
How to turn off or disable the startup of Intel driver in Windows 10
1) Press Ctrl + Shift + Esc
2) It will display the task manager, click on the Startup tab.
3) You will find list of programs that start on your Windows 10 computer.
4) Find "hkcmd Module, igfxTray Module ,Persistence Module or some other things that were
developed by Intel Corporation.
Important note : Some of them will be a core property of your display or some other devices driver,
so disabling those things will make your system unstable, so its better to leave it on, unless it really
slows your system..
5) Right click on those items and select disable.
Thats it..
This fixed the problem of mine..
Click to find latest articles
Available link for download
Tuesday, January 24, 2017
Cannot start Firewall service in Windows 10 local computer Solved
Cannot start Firewall service in Windows 10 local computer Solved
Today, While i was configuring my PC to suppress some network related issues i was faced with an
strange error.. The issue was with Windows Firewall, when i clicked on Recommended settings, it
didnt change anything, in fact the option was not even grayed out, which made me to guess the error
and as usual i tried my best go to method and it worked...
If you too are faced with such situation or even similar errors like cannot start firewall service
error code 1068 or 1079 in Windows 10 ,then i hope the below method works for you too you
dont need to reinstall windows firewall ..
Just follow the Steps..
1) Login to your Windows 10 PC
2) Run CMD as Administrator
[See : How to Run Cmd as Administrator]
3) Type the following Command
Sfc/scannow
4) Hit Enter.
Wait,for the scan results to complete
5) Restart your PC
Method 2 : Start Firewall service Manually
Step 1 : Sign-in to Your Windows PC.
Step 2 : Press Windows + R Key i.e Run Command.
Step 3 : Type Services.msc
Step 4 : Hit Enter.
Step 5 : You Will be taken to Services that Windows runs into Your System
Step 6 : Scroll down to Find Windows Firewall
Step 7 : Click on Windows Firewall Service.
Step 8 : Right Click on it And Select Properties.
Step 9 : You Will Be Taken To New Window.
Step 10 : Select Start to Start the Service immediately And Follow Next Step.
Step 11 : Click On StartUp Type And Select Automatic
How to Start Firewall service using Powershell
The above methods will take you some time to figure it out, but you can start the service in a single
step using powershell..
1) Open Powershell
[See : How to open Powershell]
2) type the following command - > Hit enter
Get-service MpsSvc
3) It will display the status of Windows Firewall,now run the following command
start-service MpsSvc
(or)
Restart-service MpsSvc

4) Restart your PC.
Thats it..
Works on all builds of Windows 10, Windows 8.1 and Windows 7.
Step 2 : Press Windows + R Key i.e Run Command.
Step 3 : Type Services.msc
Step 4 : Hit Enter.
Step 5 : You Will be taken to Services that Windows runs into Your System
Step 6 : Scroll down to Find Windows Firewall
Step 7 : Click on Windows Firewall Service.
Step 8 : Right Click on it And Select Properties.
Step 9 : You Will Be Taken To New Window.
Step 10 : Select Start to Start the Service immediately And Follow Next Step.
Step 11 : Click On StartUp Type And Select Automatic
How to Start Firewall service using Powershell
The above methods will take you some time to figure it out, but you can start the service in a single
step using powershell..
1) Open Powershell
[See : How to open Powershell]
2) type the following command - > Hit enter
Get-service MpsSvc
3) It will display the status of Windows Firewall,now run the following command
start-service MpsSvc
(or)
Restart-service MpsSvc
4) Restart your PC.
Thats it..
Works on all builds of Windows 10, Windows 8.1 and Windows 7.
Available link for download
Wednesday, January 18, 2017
Windows keeps changing default printer in Windows 10 Solved
Windows keeps changing default printer in Windows 10 Solved
Windows keeps changing default printer in Windows 10 - Thats what we gonna show in this post.
If you are using Windows 10 then you may had encountered this problem which our reader
experienced. He complained Windows Keeps changing default printer in Windows 10. and wish to
know something that will control it, whether it is through registry or powershell.
So,in this post lets see how to stop windows changing default printer.
Do you need any software?
No, we dont need an software to control those settings, as there is already an inbuilt option to do that
task inside settings.
so, you dont need to change or edit registry, run powershell commands and so on.
then, how to do it..
Just follow the below steps..
1) Open settings
[Helpful link : How to open settings using different methods in Windows 10]
2) Click on Devices.
3) Select Printers and scanners On your right pane,you can find many options,
4) Find the option Let Windows Manage my default printer
Under that, there will be a text "When this is on, windows will set your default printer to be the one
you used most recently at your current location"
5) Under that, there will be an option to switch it on or off. Select left side of the option, so that it
looks off.
![Windows keeps changing default printer in Windows 10 [Solved]](https://blogger.googleusercontent.com/img/b/R29vZ2xl/AVvXsEiU0yXYrL9ZWkSQ2Fl7cuYLOMwZ1WifrGKhmTRLatCaC_rYLrJSqMVG3uh6_qHumWhicuArWE5mDCgAUwIA-Ij7bAYvEMRbN9JHui_CfZjfAG2jUeA4lImgov9y9UUHdjXfpDIWFs0zbQk/s320/let-windows-manage-my-printer.gif "Windows keeps changing default printer in Windows 10 [Solved]")
Thats it, it will fix the problem..
Hope it is helpful.
If you are using Windows 10 then you may had encountered this problem which our reader
experienced. He complained Windows Keeps changing default printer in Windows 10. and wish to
know something that will control it, whether it is through registry or powershell.
So,in this post lets see how to stop windows changing default printer.
Do you need any software?
No, we dont need an software to control those settings, as there is already an inbuilt option to do that
task inside settings.
so, you dont need to change or edit registry, run powershell commands and so on.
then, how to do it..
Just follow the below steps..
1) Open settings
[Helpful link : How to open settings using different methods in Windows 10]
2) Click on Devices.
3) Select Printers and scanners On your right pane,you can find many options,
4) Find the option Let Windows Manage my default printer
Under that, there will be a text "When this is on, windows will set your default printer to be the one
you used most recently at your current location"
5) Under that, there will be an option to switch it on or off. Select left side of the option, so that it
looks off.
Thats it, it will fix the problem..
Hope it is helpful.
Available link for download
Subscribe to:
Posts (Atom)