Showing posts with label how. Show all posts
Showing posts with label how. Show all posts
Wednesday, March 22, 2017
How to update OBDSTAR X300 PRO3 Key Master online
How to update OBDSTAR X300 PRO3 Key Master online
Ce blog est un tutoriel pour la mise à jour OBDSTAR X300 PRO3 Key Master en ligne. Les étapes sont les suivantes pour votre référence!
Étape 1. Allumez votre OBDSTAR Key Master périphérique, choisissez " A propos" dans le menu principal. Vous pouvez trouver le numéro de série et le mot de passe.


Retirez la carte SD comme le montrent limage:

Étape 2. Utilisez le numéro de SN et mot de passe pour enregistrer votre compte sur le site OBDSTAR. Téléchargez et installez OBDSTAR Un outil de mise à niveau clé sur le site officiel OBDSTAR: www.obdstar.com.

Étape 3. Ouvrez le "One Upgrade Key". Saisissez votre nom dutilisateur et mot de passe. Ensuite, sélectionnez "utilisateur final" et cliquez sur "Se connecter".

Saisissez votre numéro de série; cliquez sur "Sélectionner tout" suivant "Upgrade".

Maintenant, attendez le logiciel de téléchargement complet à 100%.

OBDSTAR X300 PRO3 miseniveausuccèsligne!

Original - from diyobd2.fr obd2 francais:How to update OBDSTAR X300 PRO3 Key Master online?
Available link for download
Remove Bluetooth device in Windows 10 PC How to GUIDE
Remove Bluetooth device in Windows 10 PC How to GUIDE
Remove Bluetooth device in Windows 10 - Thats what we gonna see in this post...
Works on Windows 10
Creators Update, Windows 10 Anniversary Update, and other editions of Windows like Windows 10
earlier builds like Aug 2015 and Nov 2015 builds.

Dont know, how ?? Dont worry, let me help you. Follow the instructions shown in the below link..
[Helpful link : How to Open Device Manager in Windows 10 [Guide]]
2) Now, you are on device manager, Expand Bluetooth
3) You will find the list of devices there.. Right click on the device you want to remove
4) Click on disable
Thats it..
Note : You need to re-enable the device if you want to pair it later, (follow the same steps to re-enable)..
Thats the end of this post..
Click to read all basic tutorials..
Works on Windows 10
Creators Update, Windows 10 Anniversary Update, and other editions of Windows like Windows 10
earlier builds like Aug 2015 and Nov 2015 builds.
When you cant remove bluetooth in Windows 10 or dont know how to remove bluetooth device in
Windows 10, then you can use this guide to remove bluetooth device in Windows 10.
Do you need any software ?
No, you dont need to download software disable or limit bluetooth in Windows 10, just follow
the below steps..
1) Press Windows + I keys.
2) Click on devices
the below steps..
1) Press Windows + I keys.
2) Click on devices
3) Click on Bluetooth
4) On your right pane, you can see some options and the bluetooth devices, select the device you
want to remove device or unpair and select unpair,
5) It will ask for you confirmation, click yes..
Thats it..
If that doesnt worked, which means you cannot unpair bluetooth device or cant remove bluetooth
device then you can disable or unpair the bluetooth device using the following method.
How to remove bluetooth when you cannot remove the bluetooth device in Windows 10
1) Open Device Manager.
Dont know, how ?? Dont worry, let me help you. Follow the instructions shown in the below link..
[Helpful link : How to Open Device Manager in Windows 10 [Guide]]
2) Now, you are on device manager, Expand Bluetooth
3) You will find the list of devices there.. Right click on the device you want to remove
4) Click on disable
Thats it..
Note : You need to re-enable the device if you want to pair it later, (follow the same steps to re-enable)..
It will fix your problem..
Thats the end of this post..
Click to read all basic tutorials..
Available link for download
Sleep mode settings How to set or change sleep mode settings in Windows 10
Sleep mode settings How to set or change sleep mode settings in Windows 10
Sleep mode settings- how to set or change sleep mode settings in Windows 10 thats what we gonna
see in this post - Works on Windows 10 Creators Update, Windows 10
Anniversary Update, and other editions of Windows like Windows 10 earlier builds like Aug 2015
and Nov 2015 builds.
In our last post, we had seen how to enable missing sleep option in windows 10 and how to put your
computer to sleep. but i hadnt explained how to change the amount of time your computer to put
into sleep, which is essential when putting in your PC to sleep.Because its we need to decide how
long our computer needs to sleep for example if we set it 10 minutes, then our pc will go into sleep
after 10 minutes of non usage.
So,In this post lets see how to change sleep settings in Windows 10.
Again, the same words, you dont need an software to fix sleep mode settings on windows 10, all
you need to is just explore like i always do..
OK,lets see how to change sleep settings on Windows 10. there are two ways, we can change or
set sleep settings in windows 10 one is traditional way through control panel and other is through
settings. If you are using windows 10 latest build, then you cant change sleep settings using
control panel because they are migrated into new app called settings, so we can say the control
panel step wont work 99 % so i explain the steps through settings app.
How to change sleep settings on Windows 10 and where is sleep mode located in windows 10
Just follow the below steps..
1) Open settings
[Helpful link : How to open settings using different methods in Windows 10]
2) Click on System.
3) It will open a new window, on that find an option called power & search options on your left pane..
4) Now, you will see different options on your right pane.. just look for an option sleep..
Under that, you will see On battery power, PC goes to sleep after and when plugged in. PC goes to sleep after options..
We need to customize that things, changing the things there would change the time our PC goes into
sleep..

5) Set the amount of time you wish to set ..
For example : if your computer wants to go sleep after 10 min,which means if you wish to set sleep timer for 10 minutes, then choose 10 minutes on that options..
Thats it..
You have done..???
Click to read all basic tutorials..
see in this post - Works on Windows 10 Creators Update, Windows 10
Anniversary Update, and other editions of Windows like Windows 10 earlier builds like Aug 2015
and Nov 2015 builds.
In our last post, we had seen how to enable missing sleep option in windows 10 and how to put your
computer to sleep. but i hadnt explained how to change the amount of time your computer to put
into sleep, which is essential when putting in your PC to sleep.Because its we need to decide how
long our computer needs to sleep for example if we set it 10 minutes, then our pc will go into sleep
after 10 minutes of non usage.
So,In this post lets see how to change sleep settings in Windows 10.
Again, the same words, you dont need an software to fix sleep mode settings on windows 10, all
you need to is just explore like i always do..
OK,lets see how to change sleep settings on Windows 10. there are two ways, we can change or
set sleep settings in windows 10 one is traditional way through control panel and other is through
settings. If you are using windows 10 latest build, then you cant change sleep settings using
control panel because they are migrated into new app called settings, so we can say the control
panel step wont work 99 % so i explain the steps through settings app.
How to change sleep settings on Windows 10 and where is sleep mode located in windows 10
Just follow the below steps..
1) Open settings
[Helpful link : How to open settings using different methods in Windows 10]
2) Click on System.
3) It will open a new window, on that find an option called power & search options on your left pane..
4) Now, you will see different options on your right pane.. just look for an option sleep..
Under that, you will see On battery power, PC goes to sleep after and when plugged in. PC goes to sleep after options..
We need to customize that things, changing the things there would change the time our PC goes into
sleep..
[Click on the image to view full size]
5) Set the amount of time you wish to set ..
For example : if your computer wants to go sleep after 10 min,which means if you wish to set sleep timer for 10 minutes, then choose 10 minutes on that options..
Thats it..
You have done..???
Click to read all basic tutorials..
Available link for download
Tuesday, March 21, 2017
Music wont play over my bluetooth Speaker or headset How can i fix this Solved
Music wont play over my bluetooth Speaker or headset How can i fix this Solved
Music wont play over my Bluetooth Speaker- how to fix it, thats what we gonna see in this post.
Today, when i visited my friends home he showed his new Bluetooth speaker and asked me some
suggestions why the music doesnt play over his bluetooth speaker. I Checked the usual procedures
like Whether sound drivers are installed, yes it was installed, i then checked device manager and
found out whether the device has drivers that support Windows 10, yes it was updated. But still the
problem persists later i changed an basic option that i forgot to do ???? and it fixed the problem.
So, if you are searching for something that will fix your problem of music not playing on bluetooth
device connected to Windows 10, then here is your guide.
Do you need any software ?
No, but you need appropriate drivers.. if you had connected your PC to internet, then you dont need
to worry because when connected to internet windows will automatically download the required
update thourgh windows update.
OK, then how to do it..?
Just follow the below steps..
Music wont play over my bluetooth Speaker or headset - Fix
1) As said earlier, your PC should have the latest device drivers..
if you suspect on how to confirm, check this article [Link 1] [Link 2]..
2) Check those two links, which may be helpful
After checking, make sure you had paired your bluetooth
[See : How to pair Bluetooth device in Windows 10]
3) Connect your Bluetooth device to Windows 10 PC
[See : How to connect Bluetooth device in Windows 10]
4) After, pairing, connecting its time to play some music..
5) Open your music player and play any music.
Now, on your taskbar on the far right you will see the Speaker icon..
i) Right click the speaker icon, it will display many options like Playback devices, Recording
devices, Volume,Sounds, Troubleshoot Audio Problems.
![Music wont play over my bluetooth Speaker or headset. How can i fix this ? [Solved]](https://blogger.googleusercontent.com/img/b/R29vZ2xl/AVvXsEgcs1Et9S9kNJneksr2wysRSckh1uWBkzDhP1T8QeDHHjPVYzI_PEo47ALVY1_W8XxieUhdAa4klYOcWDrR9aEEcoKGvEfxe2OR9LerHcF__SSHDdjvys81IbYPZqllYYM7B_5Xy8ZUyQ8/s320/playback-devces.gif "Music wont play over my bluetooth Speaker or headset. How can i fix this ? [Solved]")
ii ) Click on Playback devices
iii) It will display the sound window.
iv ) Now, you can find devices under "Select playback device below to modify its settings"
v) There, if you had paired and connected your Bluetooth speaker or headset you will the see the
device there..
vi ) Select your device,if not
vii ) Right click the bluetooth device and click connect
viii) Now, again select your bluetooth speaker and select set it as default
You can see the audio playing on Bluetooth speaker from now on..
Thats it...
Hope it is helpful.
Thats the end of this post..
Click to read all basic tutorials..
Today, when i visited my friends home he showed his new Bluetooth speaker and asked me some
suggestions why the music doesnt play over his bluetooth speaker. I Checked the usual procedures
like Whether sound drivers are installed, yes it was installed, i then checked device manager and
found out whether the device has drivers that support Windows 10, yes it was updated. But still the
problem persists later i changed an basic option that i forgot to do ???? and it fixed the problem.
So, if you are searching for something that will fix your problem of music not playing on bluetooth
device connected to Windows 10, then here is your guide.
Do you need any software ?
No, but you need appropriate drivers.. if you had connected your PC to internet, then you dont need
to worry because when connected to internet windows will automatically download the required
update thourgh windows update.
OK, then how to do it..?
Just follow the below steps..
Music wont play over my bluetooth Speaker or headset - Fix
1) As said earlier, your PC should have the latest device drivers..
if you suspect on how to confirm, check this article [Link 1] [Link 2]..
2) Check those two links, which may be helpful
After checking, make sure you had paired your bluetooth
[See : How to pair Bluetooth device in Windows 10]
3) Connect your Bluetooth device to Windows 10 PC
[See : How to connect Bluetooth device in Windows 10]
4) After, pairing, connecting its time to play some music..
5) Open your music player and play any music.
Now, on your taskbar on the far right you will see the Speaker icon..
i) Right click the speaker icon, it will display many options like Playback devices, Recording
devices, Volume,Sounds, Troubleshoot Audio Problems.
ii ) Click on Playback devices
iii) It will display the sound window.
iv ) Now, you can find devices under "Select playback device below to modify its settings"
v) There, if you had paired and connected your Bluetooth speaker or headset you will the see the
device there..
vi ) Select your device,if not
vii ) Right click the bluetooth device and click connect
viii) Now, again select your bluetooth speaker and select set it as default
You can see the audio playing on Bluetooth speaker from now on..
Thats it...
Hope it is helpful.
Thats the end of this post..
Click to read all basic tutorials..
Available link for download
Sunday, March 19, 2017
Pin app to taskbar in Windows 10 How to Updated
Pin app to taskbar in Windows 10 How to Updated
Whether you are looking for how to pin app to taskbar or how to solve the problem cannot pin to
taskbar,(which means pin to taskbar is not working) here is an guide on how to do in windows 10.
In our last post, i had explained how to pin an app to start menu [Check it here], in this post i like to
show how to pin apps to taskbar in Windows 10.
Of course, there are many ways available to pin an app to taskbar or pin an app to desktop in
windows 10. But, some of it are complicated so i like to show only the couple of Ways you can use it.
How to Pin an App to taskbar in Windows 10
![Pin app to taskbar in Windows 10 - How to [Updated]](https://blogger.googleusercontent.com/img/b/R29vZ2xl/AVvXsEjp_jKmPAPS00mdUiP1qqF5lWHPZFipeaOq4HZOow4v_ItYs6fhG06-dhhVWc_85E69zT_FGHjCZ1CdxusRBg5RH3J_CIYtjpFQ0CMdCmIFownl2kPzK8jDFI4hr3rmwC1isB4n4yMdI5Y/s320/pin-to-taskbar.gif "Pin app to taskbar in Windows 10 - How to [Updated]")
taskbar,(which means pin to taskbar is not working) here is an guide on how to do in windows 10.
In our last post, i had explained how to pin an app to start menu [Check it here], in this post i like to
show how to pin apps to taskbar in Windows 10.
Of course, there are many ways available to pin an app to taskbar or pin an app to desktop in
windows 10. But, some of it are complicated so i like to show only the couple of Ways you can use it.
How to Pin an App to taskbar in Windows 10
1) First decide the App you wish to pin it to start..
2) Press Windows( logo) key on the keyboard or Click on the start button.
3) You will see some apps displayed there..
i) Scroll down and find the App you wish to Pin to taskbar
ii) Right click on that app, you will see many options like Pin to start, More, uninstall..
iii) Select more, you will see some options like Pin to taskbar , Run as Administrator, Uninstall.
iv) Click on Pin to taskbar.
Thats it..
You will see your App pinned to taskbar.
Cannot Pin an App to taskbar or Pin to taskbar is not working
If you came up with the above problem like cant pin app to taskbar, then you can follow some of the
oldest methods that you may had worked while pinning an item to taskbar like in windows 7.
OK, here is my solution...
1) Open the item or app you wish to pin to taskbar
2) When it opened, you will see its icon on the taskbar, for example if you wish to pin chrome to
taskbar in Windows 10, then you can pin it by..
i) First Open chrome browser..
ii) you will see the globe like icon (the logo) on your taskbar..
3) Right click on the icon
4) Select Pin to taskbar
Thats youre done..
Let me tell you a secret??, probably you may had already known..
You can pin the app or folder to taskbar by simply dragging it to taskbar.
Which means, just click on the folder or app on your desktop or shortcut, hold your mouse and drag
it to the taskbar, you will see the app or folder now pinned.????
Like this, you can pin an app whether it is windows 10 laptop or desktop.. You can pin it to taskbar.
Thats it..
Other Posts..
Click to see all tutorials of windows 10...
Available link for download
How to Use Android OS In Your PC Or MAC Using Andy In Hindi Urdu Tutorial
How to Use Android OS In Your PC Or MAC Using Andy In Hindi Urdu Tutorial
Available link for download
Friday, March 17, 2017
How To Impress eCommerce Customers On Your Web Site
How To Impress eCommerce Customers On Your Web Site
How To Impress Customers with Professional Business Communciation Skills.
Communicating with customers in writing:
Now that we have discussed how important it is to be honest with your customers through your website, let’s take it to the next step – communications with those customers. Let’s assume a few things here for the purpose of illustrations and examples. First, let’s assume your main way of communicating with customers is in writing in either letters or emails.
No one likes to get a stiff, complicated and wordy business letter to read; especially if it is filled with acronyms, technical terms and jargon unfamiliar to the reader. When we get those, it usually tells us the author is stiff, serious and not a good communicator. Ever talk to an insurance salesman? Now be honest, how much did you REALLY understand of what he/she was saying? 10%? Maybe 20%? Don’t be like that to your customers! We should never allow our customers to think that of us if we are trying to sell them something! It furthers the misconception of the buyer that, “If I buy something from this guy, dealing with him will not be a pleasant experience.” They will most likely go elsewhere.
The best way to write any business correspondence is to write it the same way you would explain it to them in person. Practice it. It’s called “Conversational Writing” and has long been taught in good business schools everywhere. For some reason however, not everyone passed the course. Especially lawyers – they are trained to write thousands of words which mean absolutely nothing to the average Joe. That guarantees them that we must hire them to read and interpret what others (or they) write. Don’t make your customers feel like that! Be conversational and leave out complicated words, acronyms or jargon particular to your line of business. If you must use a “special” word, then make sure define it without demeaning them into feeling uninformed. They will be much more impressed with your ability to write plainly and clearly to them than they would be if you tried to “snow” them with overly complicated phrases or words, just to prove how smart you are. It will have the opposite effect, guaranteed.
Many have defined the perfect business letter as “Yellow, Red, Green.”
The first (YELLOW) part means put the greeting up front and briefly state what you will discuss with them and what you expect the letter to accomplish.
Next (the RED part) explain in detail (not too complicated) what you are writing about. Be specific and even add a series of steps for them to perform if necessary.
Thirdly comes the GREEN part. Thank them for their business and assure them that their business is important to you and your company. Leave them happy with a confirming statement.
That should produce a good business letter or email for you. Practice, practice, practice! Then re-read the letter to yourself as if you were the recipient. Is it plainly stated? Is it simple to understand and not contain unnecessary buzz words or technical jargon? Does it accomplish the goal you set for the when writing it in the first place? If you received it, how would you feel?
Tekoa Software, Inc.
www.TekoaSoftware.com
Available link for download
Turn live tiles on or Off settings in Windows 10 How to Updated
Turn live tiles on or Off settings in Windows 10 How to Updated
Windows 10 has an option like its predecessor Operating System known as live tiles.

What is live tiles in windows 10?
This live tiles are nothing but the option used to display the latest updates about the particular task
like update change in Weather using this live tiles. this will consume our bandwidth by running on
our Background.
lot, of us dont like this live tiles because of the above reason,but there are some people who likes it
mainly for their usefulness.
So, in this post lets see how to turn on live tiles on Windows 10 if it was not working and how to
turn off live tiles in Windows 10.
How to do it...?
Just follow the below steps.
How to turn off live tiles on Windows 10
1) Click on the Start button
2) It will display the live of items on the right pane
3) Right click on the tile you wish to turn off
4) It will display options like unpin from start, Resize and More,on that click on More.(See screenshot posted below)
5) Now,you will find the option "Turn live tile on or off" or turn live tile off Click on it..
6) It will change into the Normal icon,which confirms your live tile is OFF.
like this, you can turn off all live tiles on Windows 10 desktop, also you dont need gpo or registry to turn off or reset this live tile.
How to turn on live tiles on Windows 10
1) Click on the Start button
2) It will display the live of items on the right pane
3) Right click on the tile you wish to turn on
4) It will display options like unpin from start, Resize and More,on that click on More.
5) Now,you will find the option Turn live tile on Click on it..
6) It will now change into different icon,which confirms your live tile is ON.
Note, if Windows 10 live tiles is not working, then you need to makesure the live tiles will work for that app/option, for example We cant set live tiles for Alarm and clock.
Thats it??..
Hope it is helpful.
Available link for download
Thursday, March 16, 2017
How to get Consult 3 plus work with NEXIQ usb link
How to get Consult 3 plus work with NEXIQ usb link
I’ve been trying to get Consult 3 plus V46.11.00 to work with my NEXIQ usb link. Nexiq supports J2534 so i figured I would give it a shot. I have a CF-19 Tough book which contains all me software for diagnostic. The CF-19 runs in deep freeze all the time to prevent any issues. So I typically test software I acquire on my desktop first. Long story short I installed it on my Desktop edited the .ini file and got it to show connection to my nexiq. (Haven’t tested on a car because my desktop is in my living room). So I thought I was good even wrote a short tutorial to keep with my backups of software. I then installed on the CF-19. Edited the .ini. Expected to the the USB connection with the blue dot.... Nothing. I installed both exactly the same. Im running identical versions Windows 7. There is quite a bit of software on my CF-19 I dont if its interfering or not. Does anyone have any ideas. To be so close to it working but not able to test is frustrating. Below I will put my short tutorial to show the steps I took and also maybe it will help others. (This is not my work just the steps I found on here)
J2534 PassThru for Nissan Consult 3 plus
1. Install Niassan Consult III+.
2. Make sure the driver for your PassThru is installed.
3. Open regedit.exe
4. Navigate to HKEY_LOCAL_MACHINE > SOFTWARE > Wow6432Node > PassThruSupport.04.04
5. From there choose your device. (For example I have a Nexiq Usb-link, so I choose either " NEXIQ Technologies - USB-Link" or "NEXIQ Technologies - USB-Link Bluetooth". I choose to use standard USB-Link)
6. Once youve click on your device look in the right column for "Name"
7.Right click on "Name" and choose "Modify..."
8. A window will appear copy exactly what it say in the "Value data:" box. (For example mine is "NEXIQ USB-Link over USB")
9.Close regedit.
10. Naviagte to "C:CONSULT-III_plusSystemApplicationApplicationDataCommonSetting"
11. Open "DiagnosticTool.ini"
12. Copy & Paste the text below under "access_mode=1" in DiagnosticTool.ini
with the exeption of putting the text you copied from regedit in place of "!!!!YOUR_DEVICE_NAME!!!!":
with the exeption of putting the text you copied from regedit in place of "!!!!YOUR_DEVICE_NAME!!!!":
[device]
vi_device_name=!!!!YOUR_DEVICE_NAME!!!!
vi_device_name=!!!!YOUR_DEVICE_NAME!!!!
[mode]
debug_mode=TRUE
debug_mode_vehicle_battery=TRUE"
debug_mode=TRUE
debug_mode_vehicle_battery=TRUE"
13. Done
Ps. special thanks to the one share tips above at http://mhhauto.com/
Original:How to get Consult 3 plus work with NEXIQ usb link
Available link for download
Wednesday, March 15, 2017
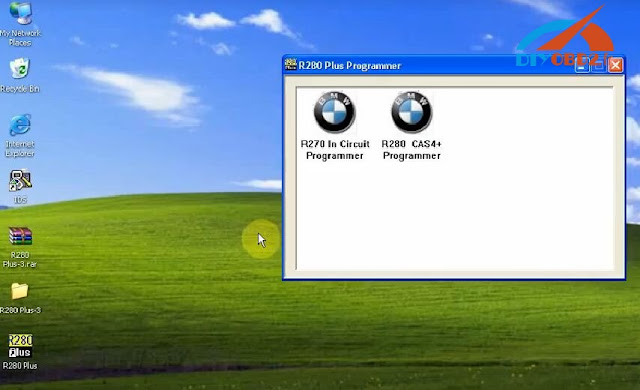
How to install R280 Plus CAS4 BDM Programmer software
How to install R280 Plus CAS4 BDM Programmer software
This is an installation guide for R280 Plus CAS4 BDM Programmer software. You will learn how to install R280 software step by step!

Step1. Insert and open R280 Programmer software CD. Copy the compress file “R280 Plus-3” RAR to desktop.
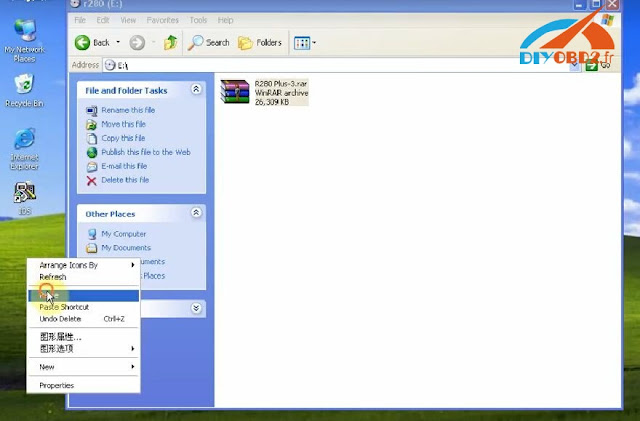
Extract R280 Plus-3” RAR to “R280 Plus-3” then you can see a folder “R280 Plus-3” on desktop. Open the folder then “R280 Plus.exe”.
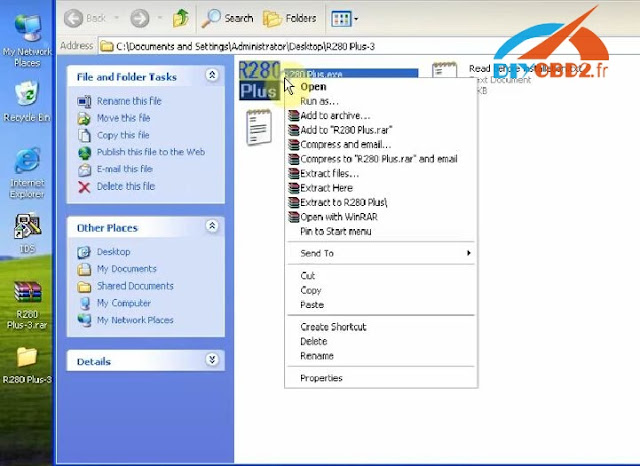
Step2. Right click “R280 Plus” icon on desktop, choose “Properties” then “Find a target”. Open “R280 CAS4 Driver” folder.
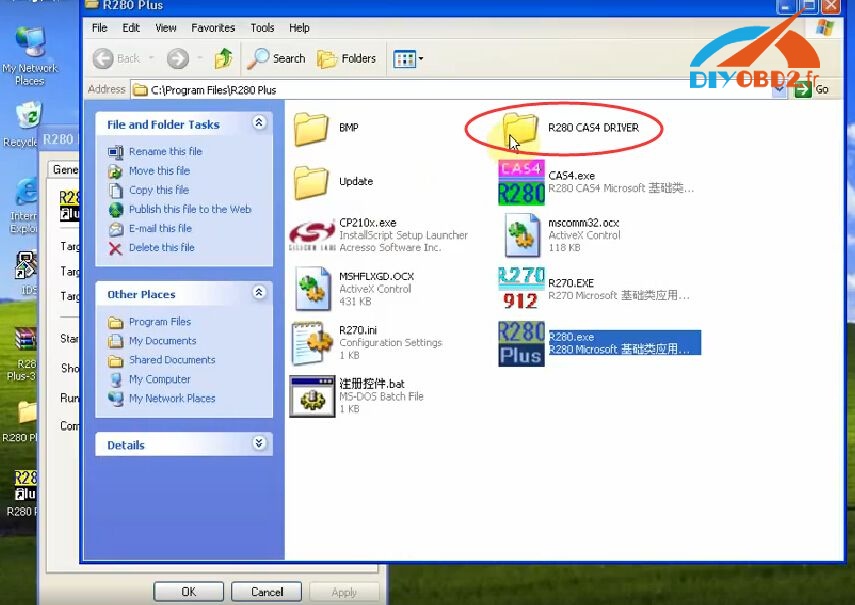
Click “CP210x” driver installer, click “Install” then wait it complete.
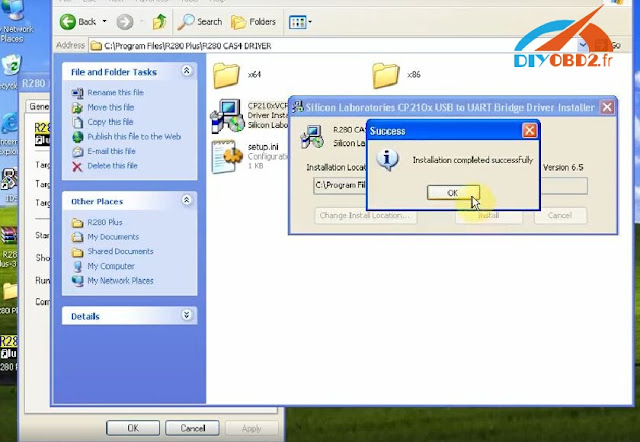
Step3. It will pop up “Found New Hardware Wizard” window for R280 CAS4. Click “Next”, “Next” and “Finish”.
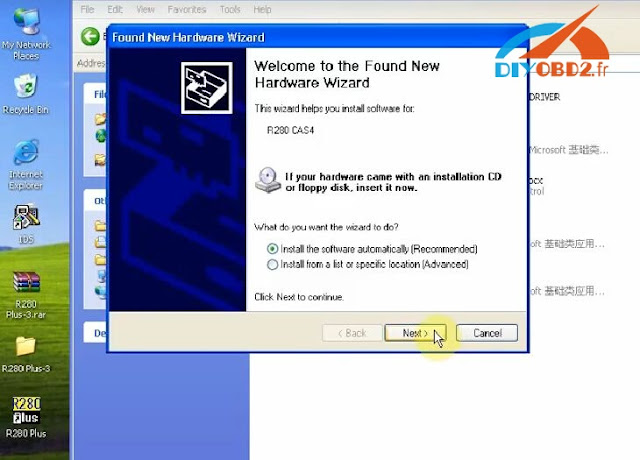
And there is another “Found New Hardware Wizard” window for CP210x. Click “Next”, “Next” and “Finish”.
Now R280 software installation is complete. You can choose both R270 In-Circuit Programmer and R280 CAS4 Programmer to use.
Original:How to install R280 Plus CAS4 BDM Programmer software?
Available link for download
How to Install Windows 7 Beginners
How to Install Windows 7 Beginners
Part 1 Installing Using a Disc
Clean Install
A clean install is intended for users who want to freshly install Windows on their computer (by deleting all of the data on the hard disk and then installing Windows) or computers that do not have an operating system yet.
 1. Enter your computers BIOS.Turn off the computer that you want to install Windows on then turn it back on. When the BIOS screen appears or you are prompted to do so, press Del, Esc, F2, F10, or F9 (depending on your computer’s motherboard) to enter the system BIOS. The key to enter the BIOS is usually shown on the screen.
 2. Find your BIOSs boot options menu.The boot options menu of your BIOS may vary in location or name from the illustration, but you may eventually find it if you search around.
- If you cant find the boot options menu, search the name of your BIOS (most likely located in the BIOS menu) online for help.
 3. Select the CD-ROM drive as the first boot device of your computer.
- Although this method may vary among computers, the boot options menu is typically a menu of movable device names where you should set your CD-ROM drive as the first boot device. It can also be a list of devices that you can set the order of their boot on. Consult a manual or the internet for help if youre stuck.
 4. Save the changes of the settings.Press the button indicated on the screen or select the save option from the BIOS menu to save your configuration.
 5. Shut off your computer.Either turn off the computer by choosing the shut-down option in your current operating system, or hold the power button until the computer powers off.
 6. Power on the PC and the insert the Windows 7 disc into your CD/DVD drive.
 7. Start your computer from the disc.After you have placed the disc into the disc drive, start your computer. When the computer starts, press a key if you are asked if you would like to boot from the disc by pressing any key. After you choose to start from the disc, Windows Setup will begin loading.
- If you are not asked to boot from the disc, you may have done something wrong. Retry the previous steps to solve the problem.
 8. Choose your Windows Setup options.Once Windows Setup loads, youll be presented with a window. Select your preferred language, keyboard type, and time/currency format, then click Next.
 9. Click the Install Now button.
 10. Accept the License Terms.Read over the Microsoft Software License Terms, check I accept the license terms, and click Next.
 11. Select the Custom installation.
 12. Decide on which hard drive and partition you want to install Windows on.A hard drive is a physical part of your computer that stores data, and partitions "divide" hard drives into separate parts.
- If the hard drive has data on it, delete the data off of it, or format it.
- Select the hard drive from the list of hard drives.
- Click Drive options (advanced).
- Click Format from Drive options.
- If your computer doesnt have any partitions yet, create one to install Windows on it.
- Select the hard drive from the list of hard drives.
- Click Drive options (advanced).
- Select New from Drive options.
- Select the size, and click OK.
- If the hard drive has data on it, delete the data off of it, or format it.
 13.Install Windows on your preferred hard drive and partition.Once youve decided on where to install Windows, select it and click Next. Windows will begin installing.


Upgrade
An Upgrade installation upgrades an older version of Windows on your computer (E.G. Windows Vista to Windows 7.)
 1. Start your computer normally into your current operating system.
 2. Check to see if your computer is compatible with Windows 7.The Windows 7 Upgrade Advisor scans your computer to see if you can upgrade it to Windows 7. Download it here.
 3.Prepare your computer to install Windows.
- Scan your computer for malware. Malware can prevent Windows from installing correctly.
- Disable or uninstall any antivirus software because they may interfere with the Windows installation.
- Uninstall some unnecessary programs to speed up the upgrade. You can install them after Windows 7 has finished.
- Update Windows with Windows Update.
- Delete some unnecessary files to speed up the upgrade.
- Back up your hard drive in case the installation fails and you lose your files. (optional).
 4. Insert your Windows 7 installation disc into the computer at this point.
 5. Start Windows Setup.After the disc has loaded, click Start ?Computer, double click the disc drive that Windows 7 Setup was placed in, and double-click setup.exe on the disc. Allow Setup to start.
 6Click Install Now.
 7. Decide whether to install updates for Windows Setup.The updates are intended to fix known problems with Windows Setup and installing updates makes your installation smoother and more stable. To get updates, click Go Online to get the latest updates for installation (recommended). To skip updates, click Do not get the latest updates for installation.
 8. Accept the License Terms.Read over the Microsoft Software License Terms, check I accept the license terms, and click Next.
 9. Select the Upgrade installation.


Part 2 Installing Using a Flash Drive or External Drive
Installing Windows Setup to the Flash Drive or External Drive
You will need to extract the Windows Setup files to a drive before continuing any farther.
 1. Plug a drive with a minimum of 4 gigabytes of memory into a computer.
 2Move any personal files off of the drive.
 2. Download the Windows 7 Setup ISO.An ISO file is a disc image. Note: This download may take a while, depending on your internet speed.
- A list of download links is available here.
- If the link to the website does not work, click here to download a list of the links.
 4. Download and install the Windows 7 USB/DVD Download Tool from this link.
 5. Once the ISO has finished downloading, open the Windows 7 USB/DVD Download Tool.
 6. Select the ISO.On the Step 1 of 4: Choose ISO file screen of the Windows 7 USB/DVD Download Tool, select the downloaded ISO file by clicking Browse, then click Next to continue.
 7. On the Step 2 of 4: Choose media type screen, choose USB device.
 8.On the Step 3 of 4:Insert USB device screen, choose the drive you want to extract the Setup files to, then click Begin copying.
- If you receive an error that says Not Enough Free Space, click the Erase USB Device button, which will erase all of the files on the drive.
 9. Once Windows 7 USB/DVD Download Tool has finished extracting the ISO to the flash drive, your drive is ready to install Windows.
- You may delete the ISO file now, as it is no longer required.


Clean Installation
A clean install is intended for users who want to freshly install Windows on their computer (by deleting all of the data on the hard disk and then installing Windows) or computers that do not have an operating system yet. (Note: Older computers may not be able to perform a clean installation with the drive.)
 1. Make sure the drive that Windows 7 Setup was extracted onto is plugged into the computer.
 2. Enter your computers BIOS.Turn off the computer that you want to install Windows on then turn it back on. When the BIOS screen appears or you are prompted to do so, press Del, Esc, F2, F10, or F9 (depending on your computer’s motherboard) to enter the system BIOS. The key to enter the BIOS is usually shown on the screen.
- Read more »
Available link for download


Subscribe to:
Posts (Atom)